How to Configure SAML 2.0 for Cobalt
Configure SAML with Okta using their gallery app for Cobalt.
This guide is for Organization Owners who configure SAML with Okta as an identity provider (IdP) using the gallery Cobalt SAML app.
If you want to create a non-gallery application for Okta manually, see how to set up the configuration.
If your organization enforces SAML in Cobalt, users will no longer be able to authenticate through the sign-in page. They must authenticate to Cobalt only through the Okta service.
Contents
Supported Features
The Okta/Cobalt SAML integration supports the following features:
- IdP-initiated SSO
For more information on the listed features, visit the Okta Glossary.
Configuration Steps
- Sign in to Cobalt, and go to Settings > Identity & Access. You should have an Organization Owner role.
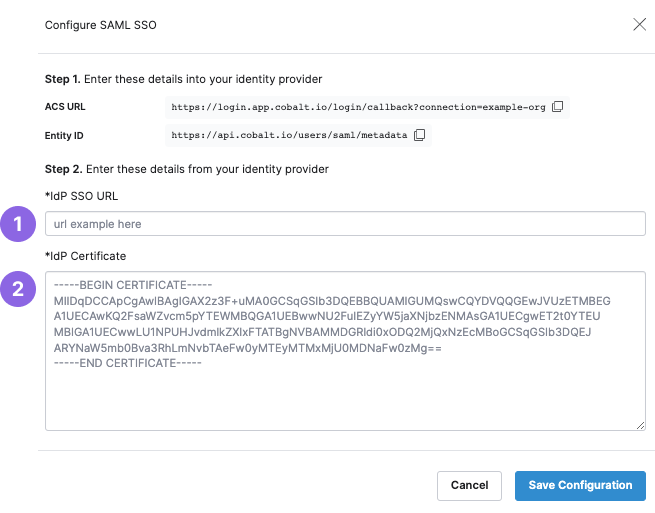
- Under Configure SAML, click Configure. An overlay for configuring SAML opens.

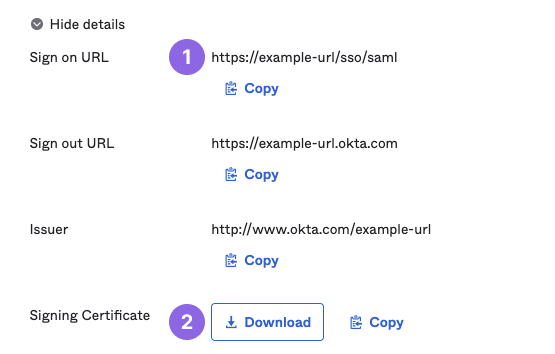
- In Cobalt, enter the following values from Okta. In the Okta Admin Dashboard, select the Sign On tab for the Cobalt SAML app, then click Edit. Under Metadata details, click More details.
- IdP SSO URL: Enter the Sign on URL from Okta.
- IdP Certificate: Enter the Signing Certificate from Okta.
- Click Save Configuration.

- In Okta, select the Sign On tab for the Cobalt SAML app, then click Edit.
- Region: Enter your region, if applicable. The slug appears in the subdomain of the ACS URL.
- Note: the default value is
us.
- Note: the default value is
- Slug: Enter your organization’s slug from Cobalt. The slug appears after
=in the ACS URL. You can also find the slug in Settings > General.
- Application username format: Select Email.

- Click Save.
- Region: Enter your region, if applicable. The slug appears in the subdomain of the ACS URL.
- Done!
Notes
The following SAML attributes are supported:
| Name | Value |
|---|---|
| user.email |