Get Pentest Updates with Webhooks
Configure webhooks to subscribe to real-time updates for your pentests.
Introducing Webhooks
With our API-based webhooks, you can set up an integration between your app and the Cobalt platform to get notifications for pentest events. We’ll send you updates for each event to your URL through an HTTP POST request.
When you work with an API, you can become aware of new data in the following ways:
- Repeatedly send requests to the same API endpoint to retrieve new information, which is known as polling.
- Configure a webhook that automatically sends new data to the specified URL.
You can configure webhooks through the API and in the Cobalt UI.
Before You Start
Before you start creating webhooks, complete the configuration in your app.
- Make sure that the URL where you want to receive notifications is valid and your services work properly. If possible, test your connections.
- (Optional) To add an extra layer of security to the integration, generate a webhook secret in your app. When we send a POST request to your URL, we include your secret in the request header. This allows you to validate that the API request is from Cobalt.
Read our Best Practices for more information.
Webhook Events
When you set up a webhook, you can select events to which you want to subscribe:
| Pentest | Finding |
|---|---|
For security reasons, we only post essential details about webhook events, such as their ID and type. To retrieve more information about the event, use the Cobalt API.
Note
For webhooks that you created before June 2023, you get updates for all events. You can adjust the configuration of your existing webhooks. Select the three-dot icon under Actions, select Edit Webhook, select webhook events in the overlay, and then select Save to confirm.Configure Webhooks in the UI
Let’s configure webhooks in the Cobalt app.
Create a Webhook
To create a webhook:
- In the Cobalt app, navigate to the Integrations page, and then select Webhooks under Native Integrations.
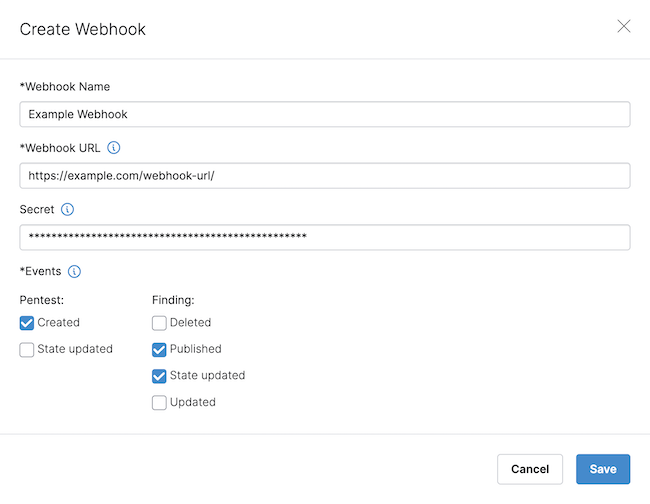
- On the Webhooks page, select Create Webhook.
- In the overlay that appears, specify the following:
- Webhook Name
- Webhook URL: URL to which Cobalt sends HTTP POST requests for pentest events.
- Use a unique name and URL for each webhook you create.
- (Optional) Secret: Your webhook secret that we use to authenticate a POST request to your URL.
- Events: Select webhook events to which you want to subscribe.
- When ready, select Save.
- We send a test event to the specified URL to validate your webhook. The webhook becomes active once the validation is complete.
- If the validation fails, we’ll deactivate your webhook within 24 hours. See Troubleshoot Webhooks for more information.

Manage Webhooks
Now you can manage the webhooks that you created.
- To make a webhook inactive, use the toggle under Active.
- To edit a webhook, select the three-dot icon under Actions, and then select Edit Webhook. Update webhook parameters in the overlay that appears.
- To delete a webhook, select the three-dot icon under Actions, and then select Delete Webhook.
- You can make a webhook inactive without deleting it.
Troubleshoot Webhooks
You can check the status of your webhooks on the Webhooks page. The following icons indicate that there is a problem with your webhook:
- Yellow warning: The webhook stopped responding to events at the specified time. We’ll deactivate the webhook after 48 hours of failed attempts.
- Red error: The webhook stopped responding, and we deactivated it after 48 hours of failed attempts.
Find solutions for common troubleshooting problems in the table below:
| Problem | Solution |
|---|---|
| You can’t create a webhook because the name or URL already exists. | Enter a unique name and URL for your webhook. |
| We failed to validate your webhook. Check the following: | |
| You can’t delete a webhook. |