HTTP Connector
The HTTP connector allows you to connect with any cloud application or service that has a HTTP-based application programming interface (API).
💡 The HTTP connector can be particularly useful for organizations looking to integrate with services without officially supported connectors.
In this example, we will create a recipe using the Integration Builder that updates a system via HTTP whenever a pentest finding is resolved. Throughout this example, you will learn the following:
- What an HTTP connector is
- How to create an HTTP connection
- How to configure the authentication type
- How to set the base URL
- How to use the HTTP action
- How to configure the HTTP method and the request URL
- How to configure and send a sample request
- How to map Cobalt data to the API’s format
- How to read the HTTP requests and responses from the job logs
HTTP connector
The generic HTTP connector allows you to interact with cloud applications through their APIs. This enables you to create actions in your workflows that communicate with your service via HTTP.
To create or update an entry in your system, you can send a POST request containing a JSON body. If you need to retrieve data from your application, you can use a GET request along with your query parameters.
Crete a new folder for your HTTP connection and recipes
Before you begin, it’s a good idea to create a new folder for all your future generic HTTP recipes.
Navigate to the Projects tab in the Integration Builder.
Click the “Create” button at the top right, then select “Folder”.

Name the new folder and choose its location. Then click “Create folder”.

You should now see the new folder in the project.
Create a dedicated folder for the connection by repeating the above steps.


You should see now the new folder for the connection.
Create an HTTP connection
Click the “Create” button at the top right, then select “Connection”.

Search for the HTTP connection and click on it.

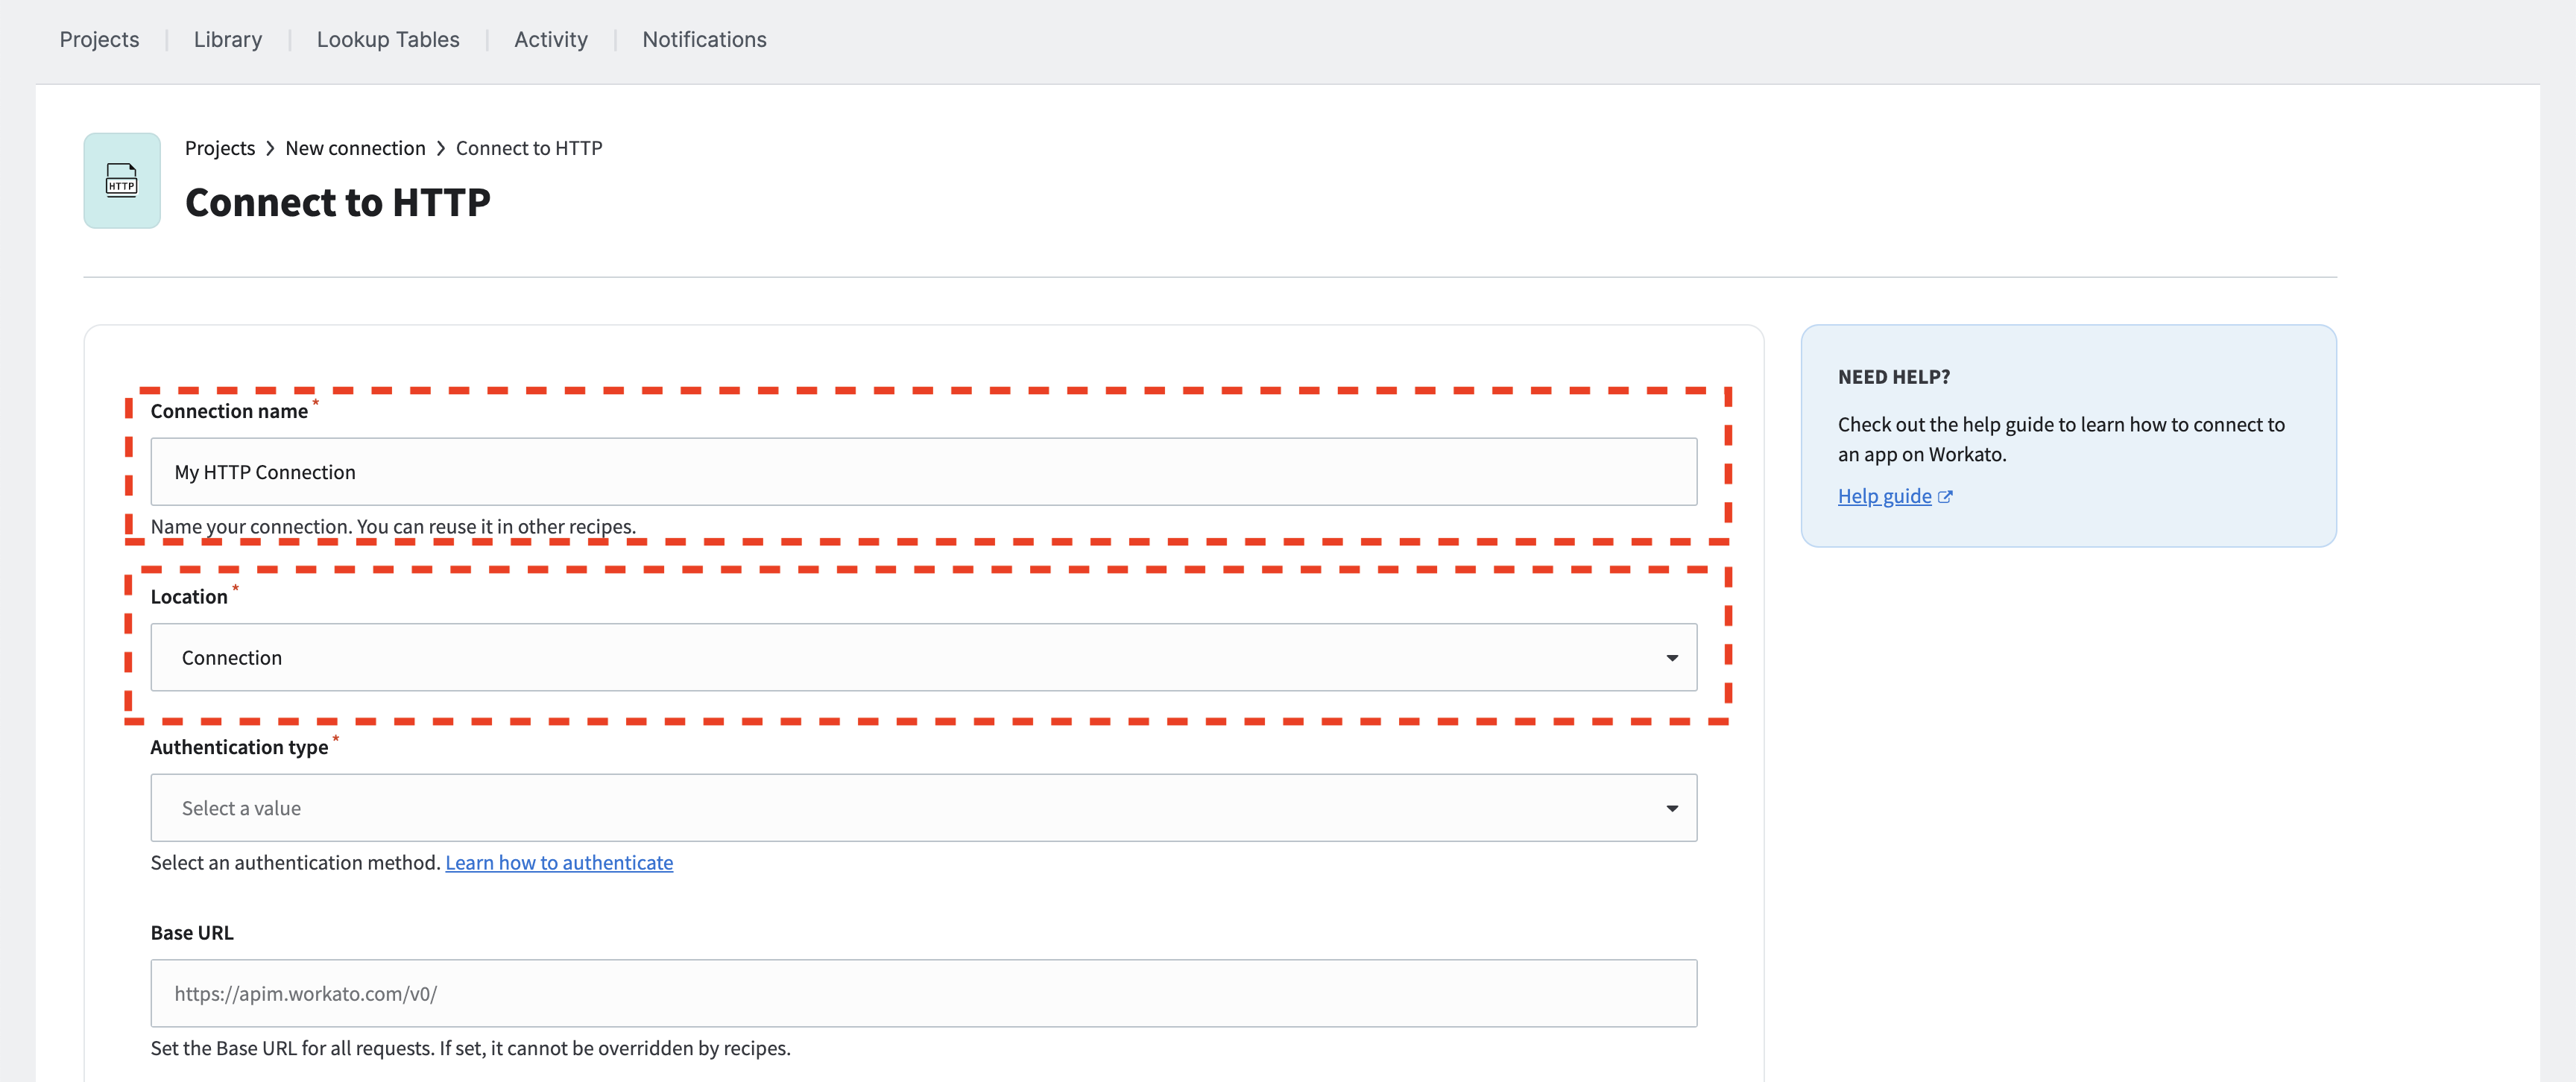
Fill in the connection name and the recipe location.
Configure the authentication type
The HTTP connection supports several authentication types. This section outlines a few of them and the required configuration steps. It includes:
Select the appropriate authentication type from the dropdown menu.
Basic
The Basic authentication type requires the username and password. It can be an API token as an alternative to using the username and password. This information is encoded in Base64 during transit using SSL.

Header authorization (Bearer token)
Use this authentication method if you have a generated token for authorization. For example, if you possess a bearer token, set the header key to Authorization and the value to Bearer my_api_token. This header with the token will be included in each HTTP request.

ⓘ Ensure you write
Bearer my_api_tokenin the header value field, not justmy_api_token.

Base URL
To limit outbound requests to a designated URL, you can set a base URL for your HTTP connection. This ensures that all users of the connection can only access the specified server or application.
There are several benefits to setting a base URL:
Ensuring Security Over the HTTP Connector
Data governance is essential, particularly when data is shared between multiple applications. By establishing a base URL, you ensure that your sensitive information will only travel through a specified endpoint, domain, or host.Use the Correct API Version
Verify that all requests target the appropriate API version of the intended application. Once the base URL is defined, all requests are directed to the same endpoint, including the API version.Maintainability
Setting the base URL makes it easier to adapt as API versions evolve. By defining a base URL, you can swiftly modify request URLs without the necessity to individually update each action. For instance, you can set the base URL to a particular version of your REST API. When it is time to change the API version, you need only to adjust the base URL of the HTTP connection.
How It Works
When an HTTP action runs, the Base URL along with the action’s Request URL is combined to create the final request URL. Consider it this way: Base URL + Action Request URL = Final request URL.
For example:
- Base URL:
https://echo.free.beeceptor.com/api/v2/ - Action Request URL:
finding/fixed - Final request URL:
https://echo.free.beeceptor.com/api/v2/finding/fixed
Set your API endpoint as the base URL.

ⓘ This example utilizes a free HTTP echo server that provides a JSON response mirroring the content of the data sent in an HTTP request. More details about the example server can be found at https://beeceptor.com/resources/http-echo/.
When you have finished the HTTP connection configuration, click on Connect.
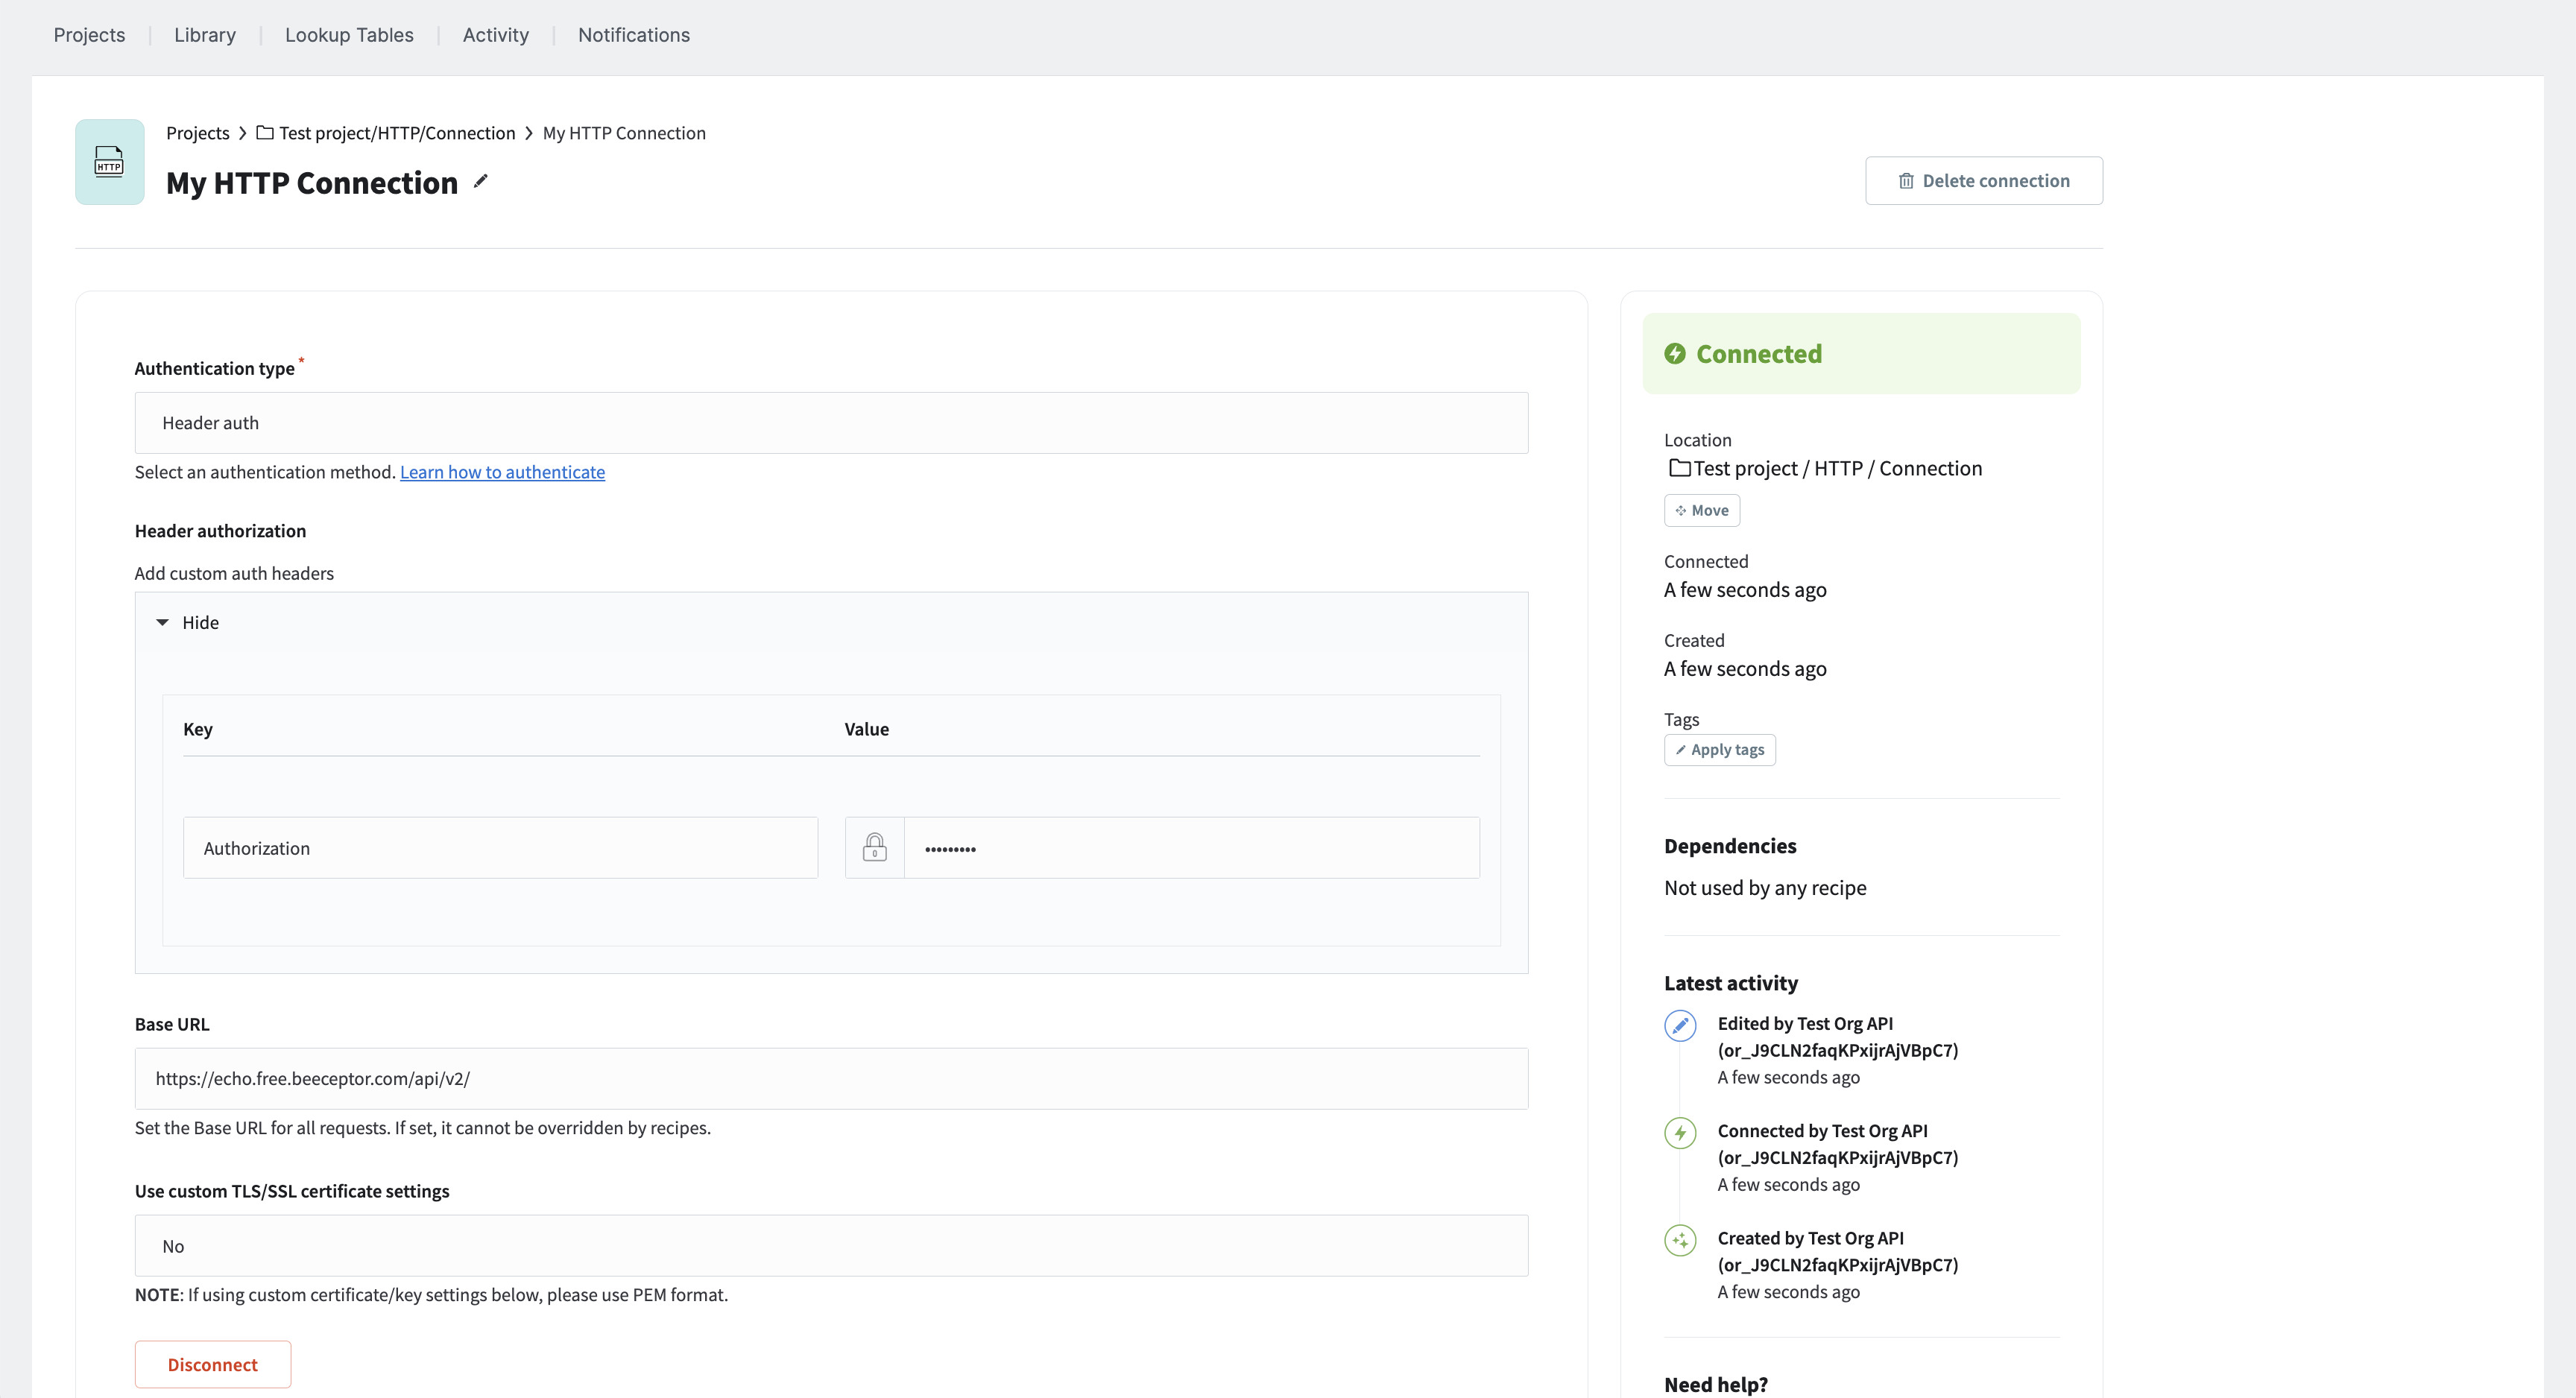
ⓘ The credentials and the accuracy of the authentication type configuration are not verified when you click Connect. The Connected status simply means that all required fields for the HTTP connection have been filled out. Subsequent steps will demonstrate how the credentials will be tested via configuring and sending a sample request.
Create a recipe
Use case
To illustrate, we want to create a recipe that updates a system via an HTTP API once a pentest finding has been fixed. For instance, if a Cross-Site Scripting (XSS) vulnerability has been addressed, we want to store relevant details such as the finding category, its severity, the finding’s ID, and the ID of the pentest itself. We will achieve this by sending an HTTP POST request with the necessary information included in the request body.
Assuming the request body that the HTTP service requires is as follows:
{
  "cobalt_finding_id": "vl_id01",
  "cobalt_pentest_id": "pt_id01",
  "title": "XSS vulnerability",
  "severity": "low",
  "type_category": "Cross-Site Scripting (XSS)"
}
You can update this information using the following HTTP request with curl:
curl --location "https://echo.free.beeceptor.com/api/v2/finding/fixed" \
--request POST \
--header "Content-Type: application/json" \
--header "Authorization: Bearer my_api_token" \
--data '{"cobalt_finding_id":"vl_id01","cobalt_pentest_id":"pt_id01","title":"XSS vulnerability","severity":"low","type_category":"Cross-Site Scripting (XSS)"}'
ⓘ Replace
https://echo.free.beeceptor.com/api/v2/finding/fixedwith the appropriate URL andmy_api_tokenwith your actual API token.
Let’s create a recipe that utilizes our HTTP connection to make the same update. Start by navigating to the Projects tab, selecting the previously created folder, clicking on the “Create” button in the top right corner, and then choosing “Recipe.”

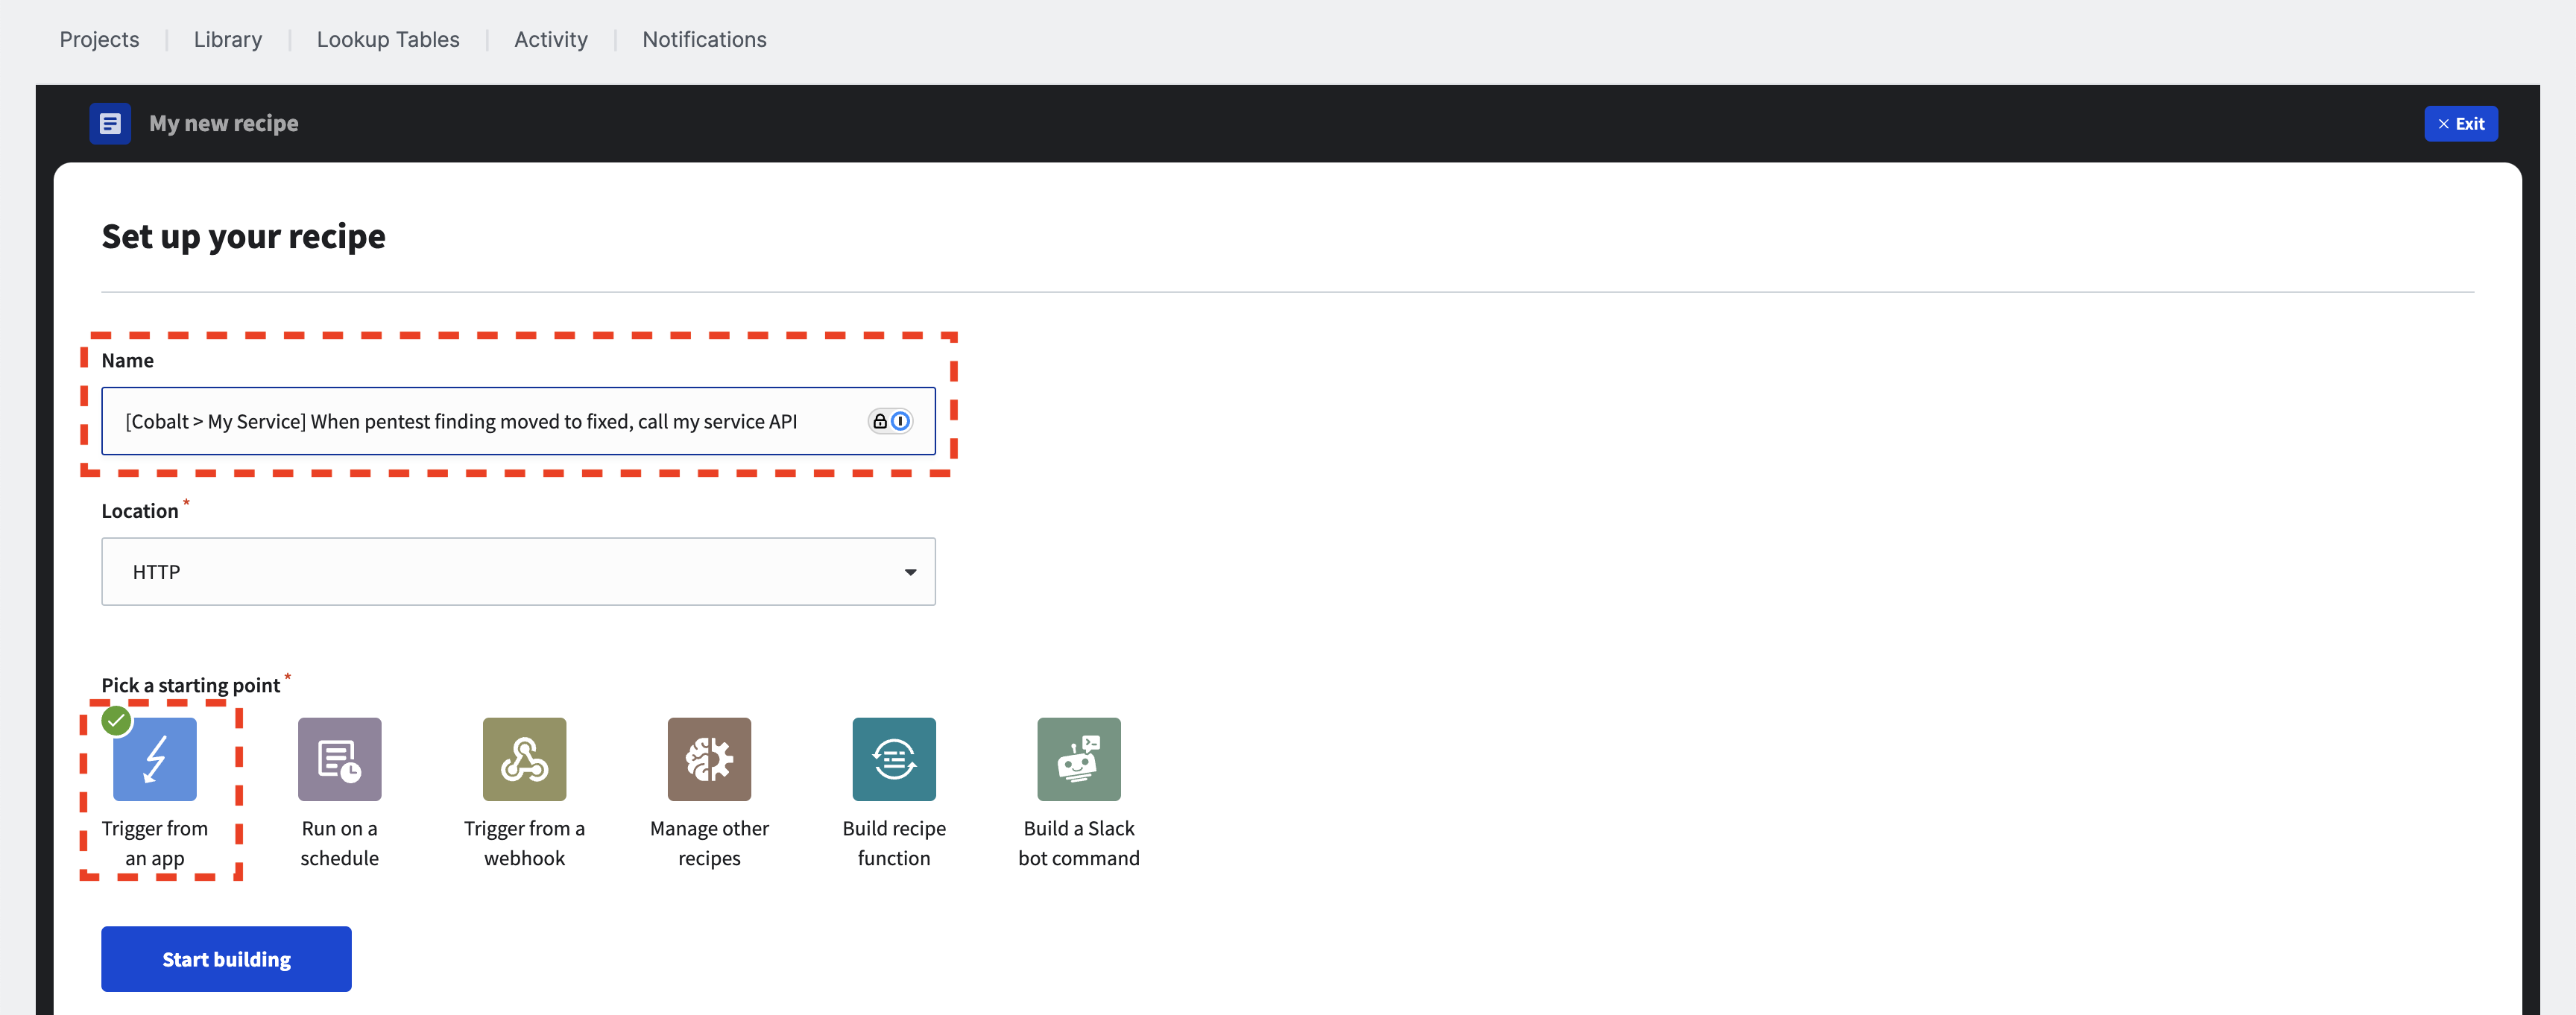
Next, specify the recipe’s name and location. Make sure to select Trigger from an app as the starting point, and then click on Start building.
Use a Trigger
Select the trigger that will initiate the recipe. We want the recipe to activate when the status of a pentest finding is updated in the Cobalt Platform. Search for the Cobalt Connector and select it.

Search for the ‘Pentest finding status updated’ trigger and select it.

Choose the configured Cobalt connection for the trigger.

By default, this trigger runs when any pentest finding status is updated. To ensure the recipe runs only when the status of the associated pentest we have configured is updated, we need to filter the events. Click on “2 optional fields are available.”
ⓘ The number of optional fields may vary depending on the type and version of the selected recipe trigger.
ⓘ This example implements a pentest finding status filter using an “IF condition” in the recipe. There are other alternative solutions, which will be discussed later.

Select the “Pentest” checkbox and then click on “Apply changes” in the modal.

A new “Pentest” dropdown will appear in the UI; select the appropriate pentest from this list.
ⓘ Filtering by pentest or asset is optional, so this step is provided for educational purposes only.

Get pentest finding
In this hypothetical use case, the recipe must update only the findings that are in the ‘Fixed’ state, while ignoring all other finding statuses. To accomplish this, the recipe will use an action to retrieve the pentest finding by its unique ID and will include an “IF condition” to filter out irrelevant status updates.
To add an action, click the plus sign (+), select “Action in app” from the popup menu, choose the Cobalt Connector, and search for the “Get pentest finding” action on the right-hand side.

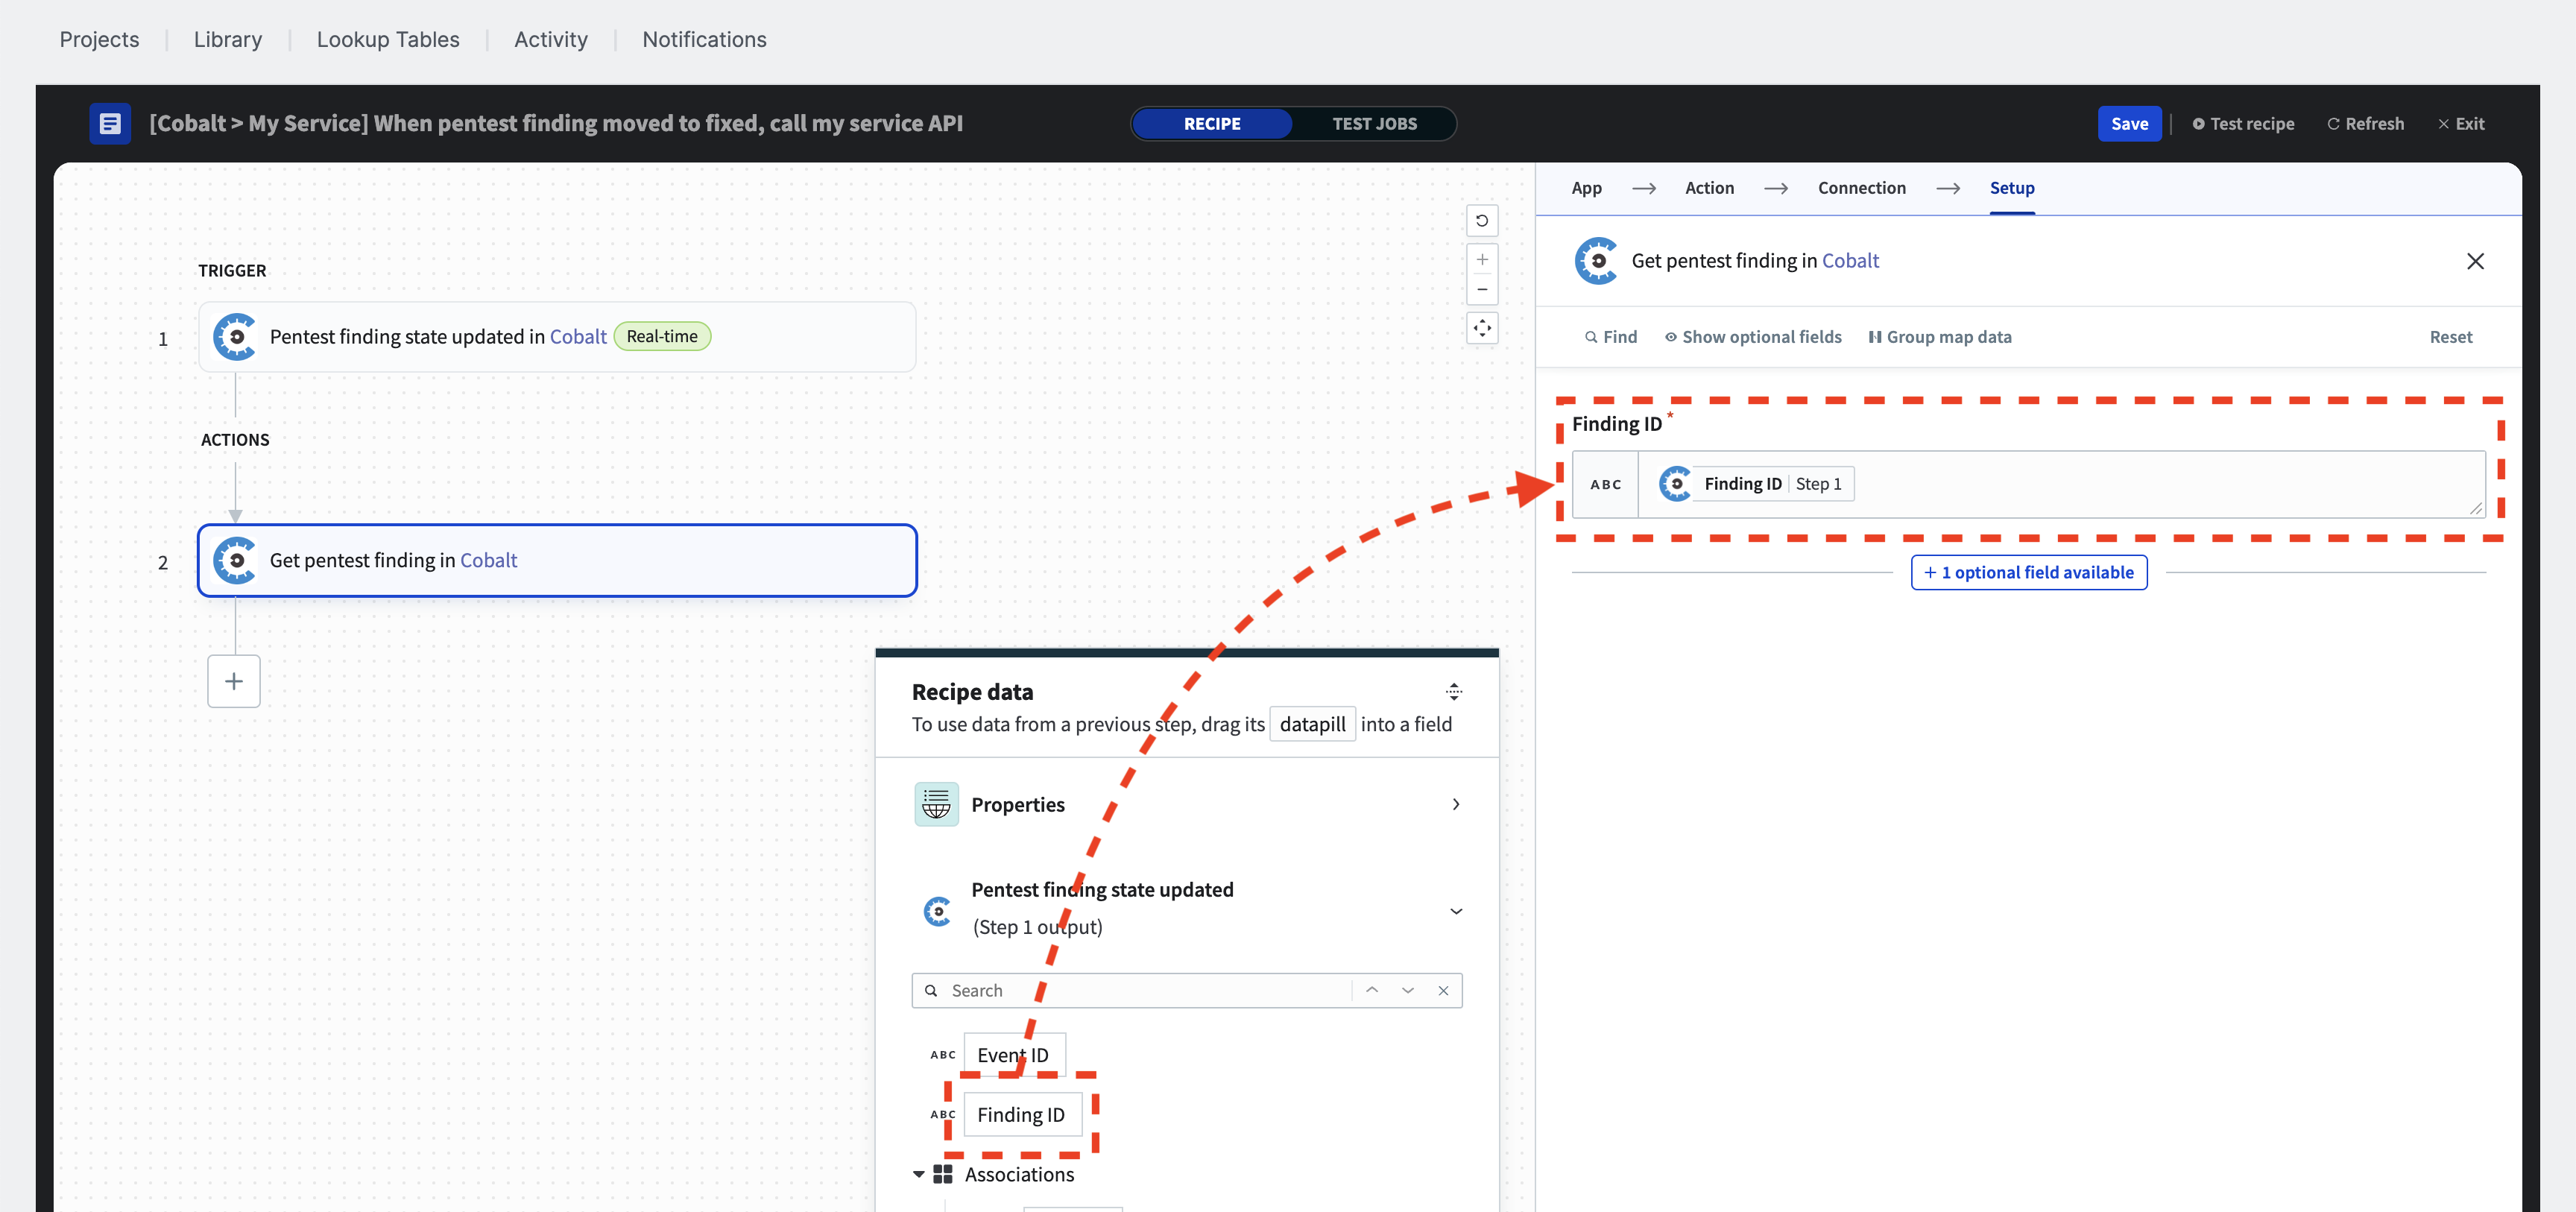
Click on the “Finding ID” field and drag the “Finding ID” datapill from the “Pentest finding state updated” trigger event into it.
Filter with IF condition
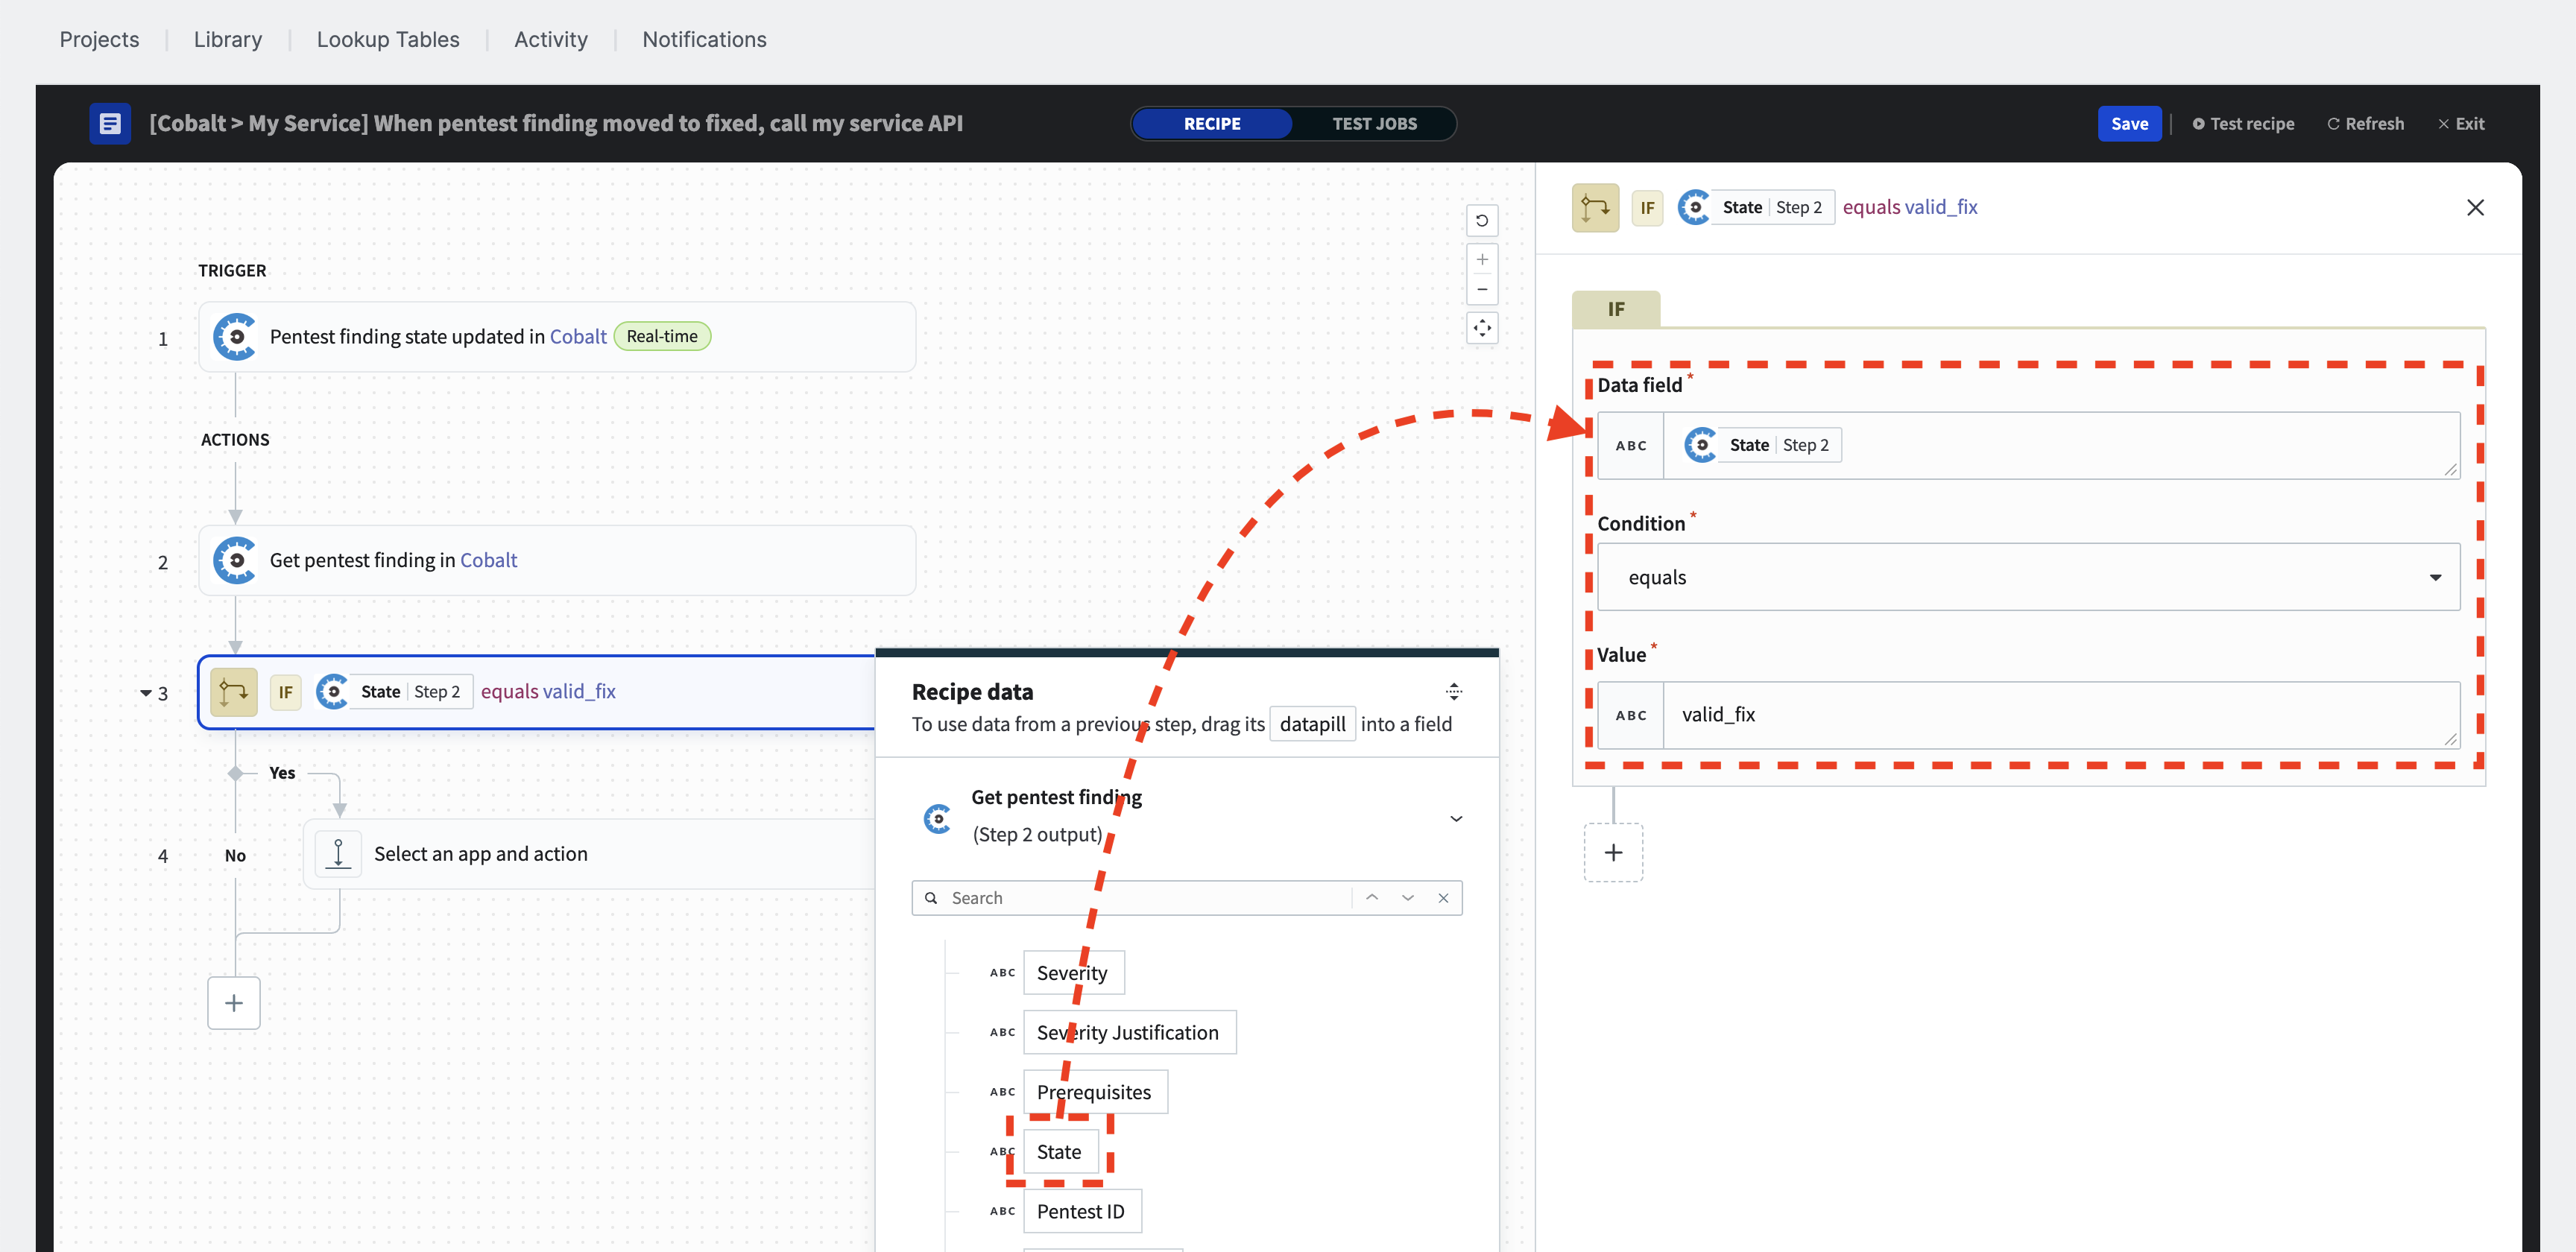
To add an “IF condition”, click the plus sign (+) and select the “IF condition” from the popup. Using the drag and drop technique, set the “Data field” of the “IF condition” to the “state” of the pentest finding, select the “equals” from the “Condition” dropdown, and set the expected value to be valid_fix.
ⓘ When filtering pentest findings by status, please use the technical API value instead of the UI name. The correct value is
valid_fix, notFixed. For detailed information on pentest finding statuses and the mappings between API values and UI names, please refer to the API documentation at https://cobalt-public-api.netlify.app/v2/#states.
ⓘ Additionally, you can utilize the “Previous Finding State” and “Current Finding State” trigger filters to achieve the same outcome. When using an IF condition within the recipe to filter pentest finding statuses, the recipe can execute independently of the current and previous statuses of the pentest. In contrast, if filters are applied to the trigger, the recipe will only activate when the filter conditions are satisfied, making the IF conditional filtering unnecessary.
Use the HTTP action
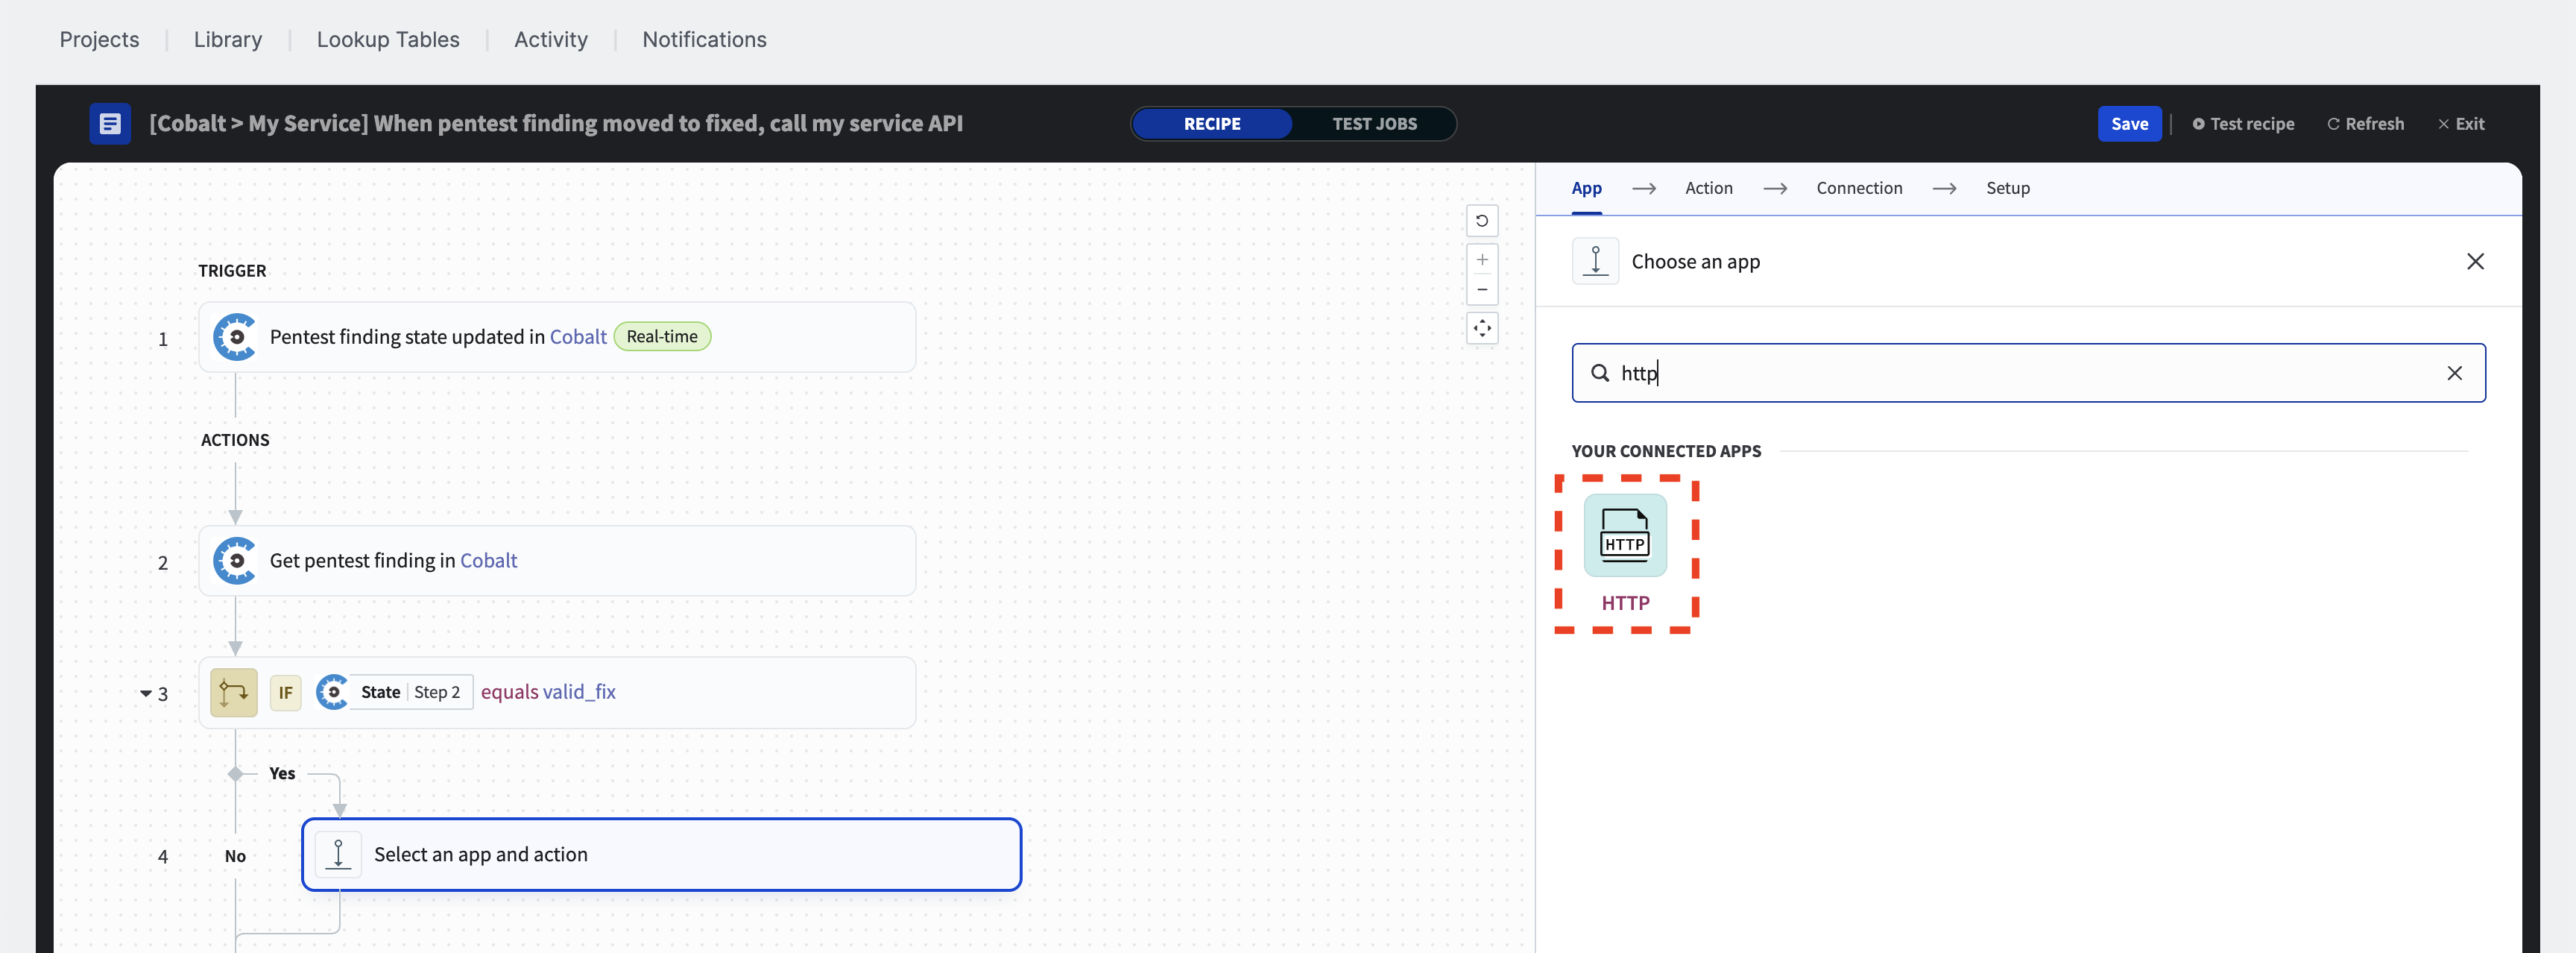
To add an HTTP action, click the plus sign (+) for the “Yes” branch of the “IF condition”, select “Action in app” from the popup menu, choose HTTP.
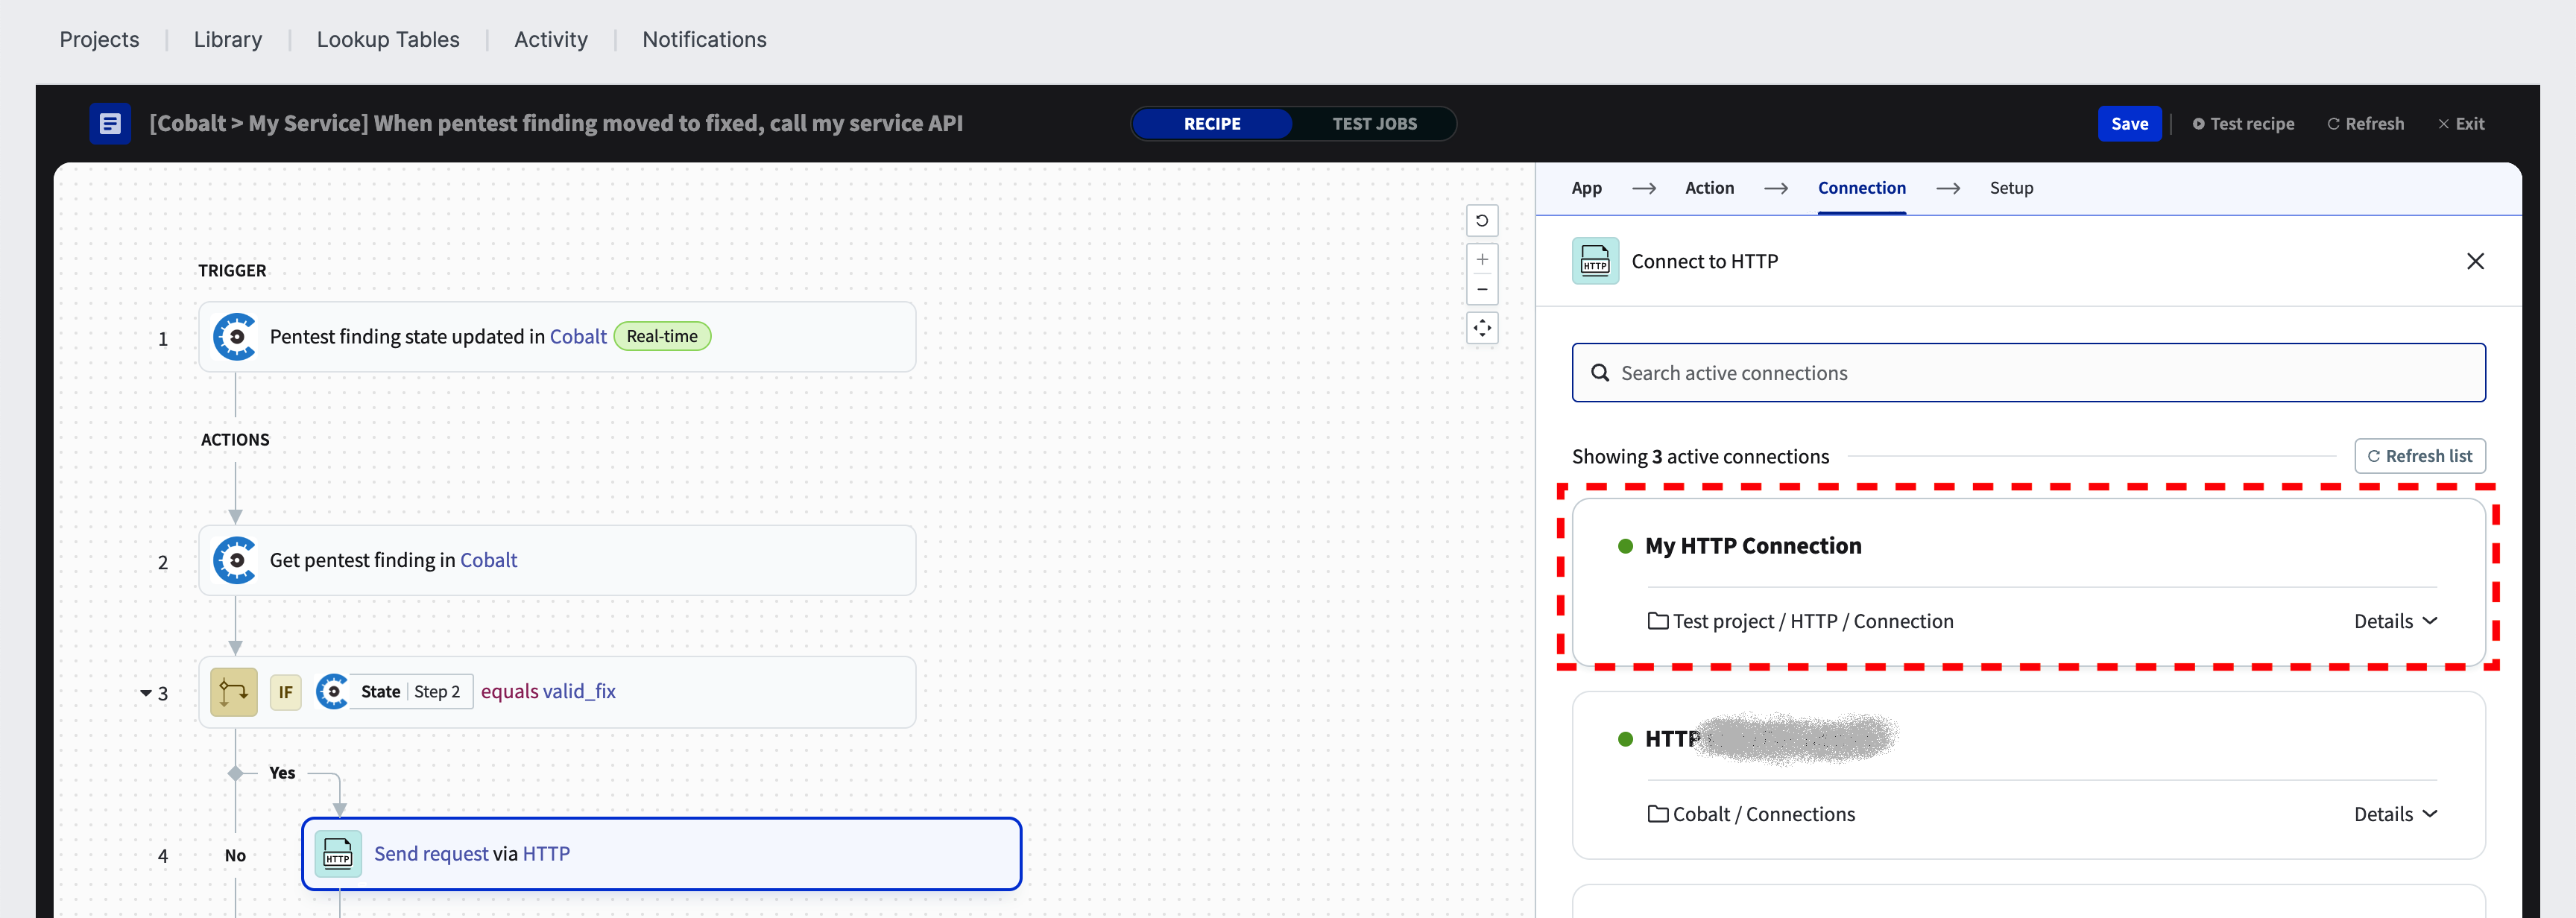
Select the previously configured HTTP connection from the list.
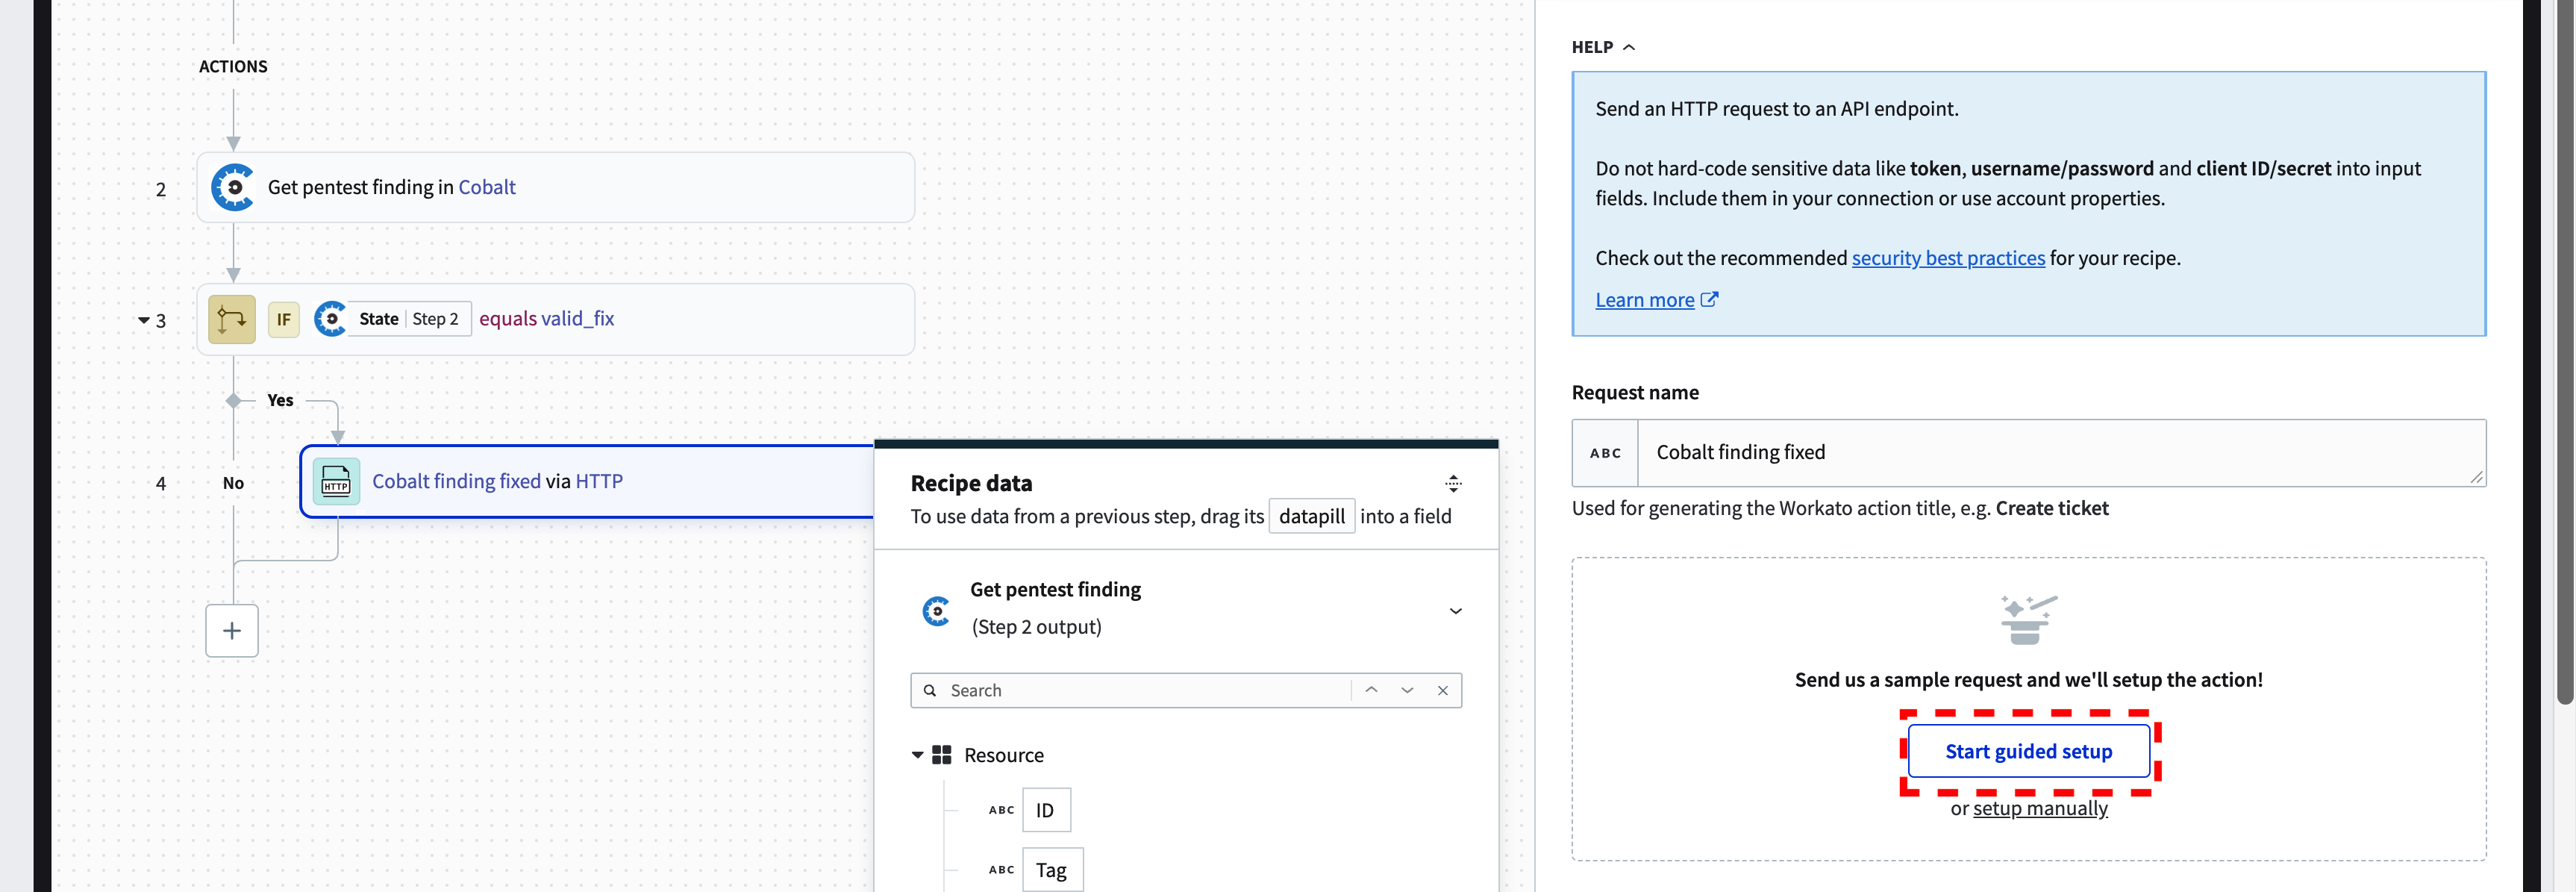
Give a descriptive “Request name” for the HTTP action and then click on “Start guided setup.” A three-step HTTP wizard will guide you through making a test request to the API endpoint. This wizard aims to suggest an optimal HTTP configuration for your endpoint whenever feasible. You can leave this setup wizard at any time if you prefer to configure the action manually.
Configure the HTTP method and the request URL
To begin, please provide the relative API endpoint path you wish to call, along with the HTTP method associated with that endpoint. This information should be available in the app’s API documentation.
ⓘ Note that we have configured the HTTP connector with a base URL, so this example will use the relative path. If you have chosen not to use a base URL for the HTTP connection, you will need to specify the absolute API endpoint.
In this example, we want to update our hypothetical system with the finding ID, type category, severity, and pentest IDs using a POST “method call”. The endpoint is located at https://echo.free.beeceptor.com/api/v2/finding/fixed, but because we have previously configured the base URL as https://echo.free.beeceptor.com/api/v2, we will use the relative path as the “Request URL”, which is finding/fixed. Proceed to the next wizard page with the “Next” button.

Configure and send a sample request
This example is designed to work with a JSON “Request content type.” You may want to modify this based on your preferences.
To proceed, copy the example HTTP body for the POST request into the “Request body” text area.
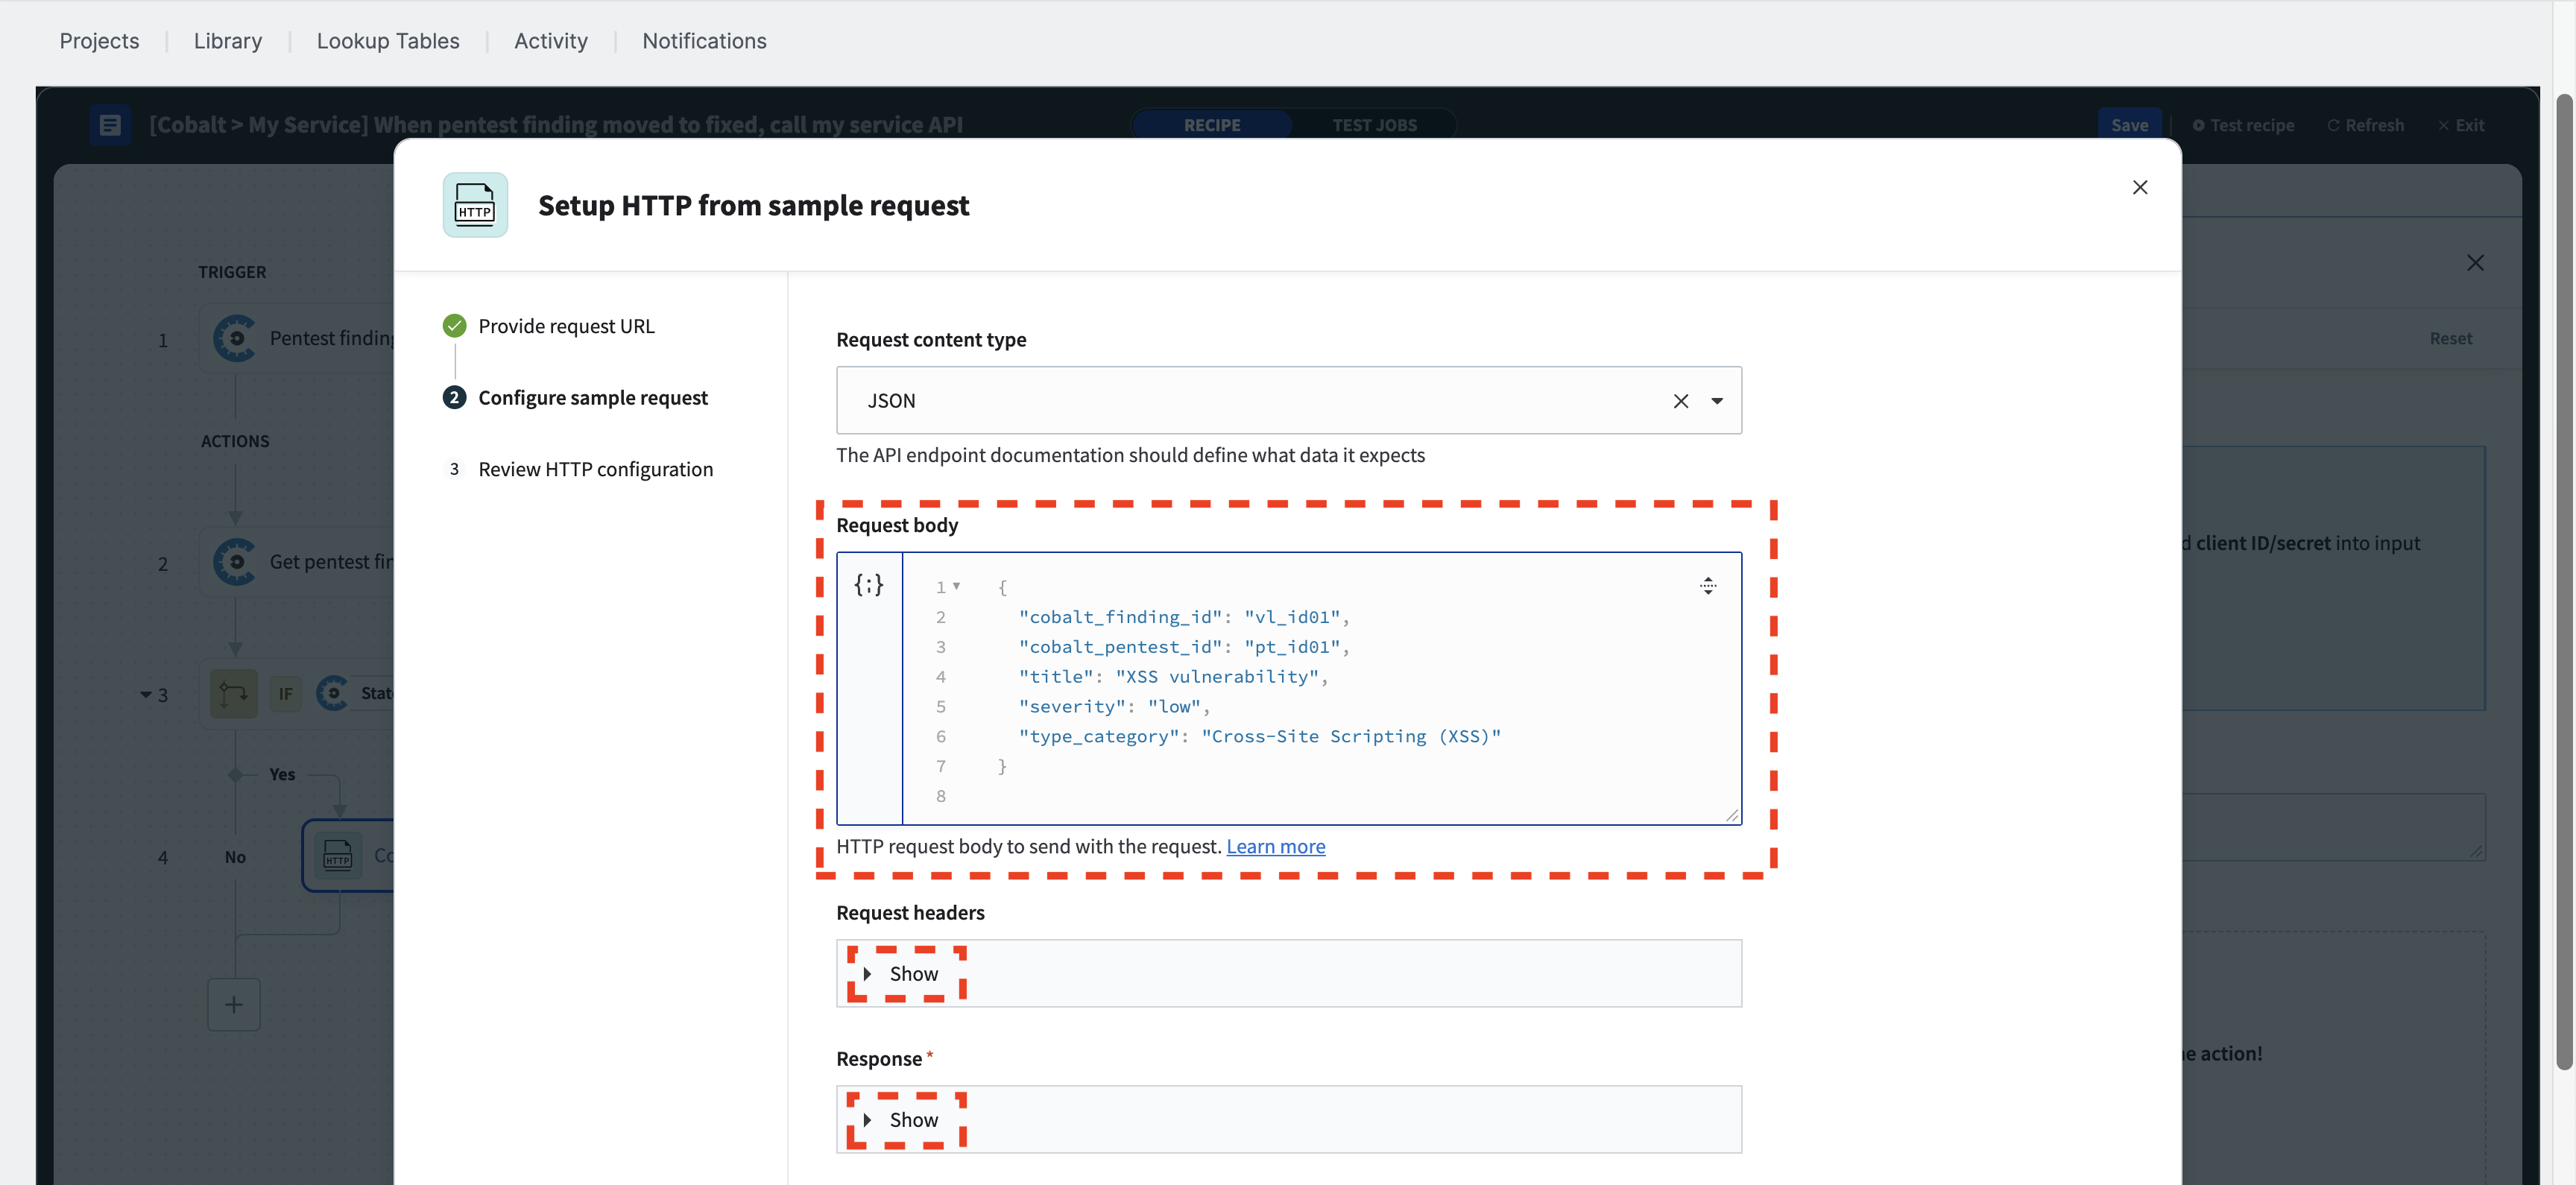
If you want to add additional headers to the HTTP request, you can configure them here. If the “Request headers” section is collapsed, click on “Show.” For demonstration purposes, we will set the “my-custom-header” for each HTTP request.

ⓘ When specifying the request body with a sample JSON and any optional request headers, please note that all values are static. After you complete the wizard, we will customize both the request body and the headers, mapping the Cobalt data to your API format to include dynamic values for each HTTP request.
ⓘ If you are using header authorization (for example, a Bearer token) and have already configured the authentication type for your HTTP connection, you do not need to add the authentication headers here. The HTTP connection will automatically handle setting the auth headers for each HTTP request.
You can also adjust the “Response content type” and the “Encoding” of the response as needed. You may have to click on “Show” if the section is collapsed. This example uses the default JSON response content type and UTF-8 encoding.

Review the HTTP configuration
❗ Exercise extra caution when working with production systems and using idempotent HTTP methods. You may want to cancel the wizard at this point and proceed with the configuration manually.
When you click the “Send request” button, the HTTP action will send a request to the API with the specified body and any optional headers. Your authentication type and credentials will be used and verified when sending a sample request.
❗ Sending a sample request might made an undesired update in your production system.
You can review the HTTP request made by the action, and also investigate the response body.
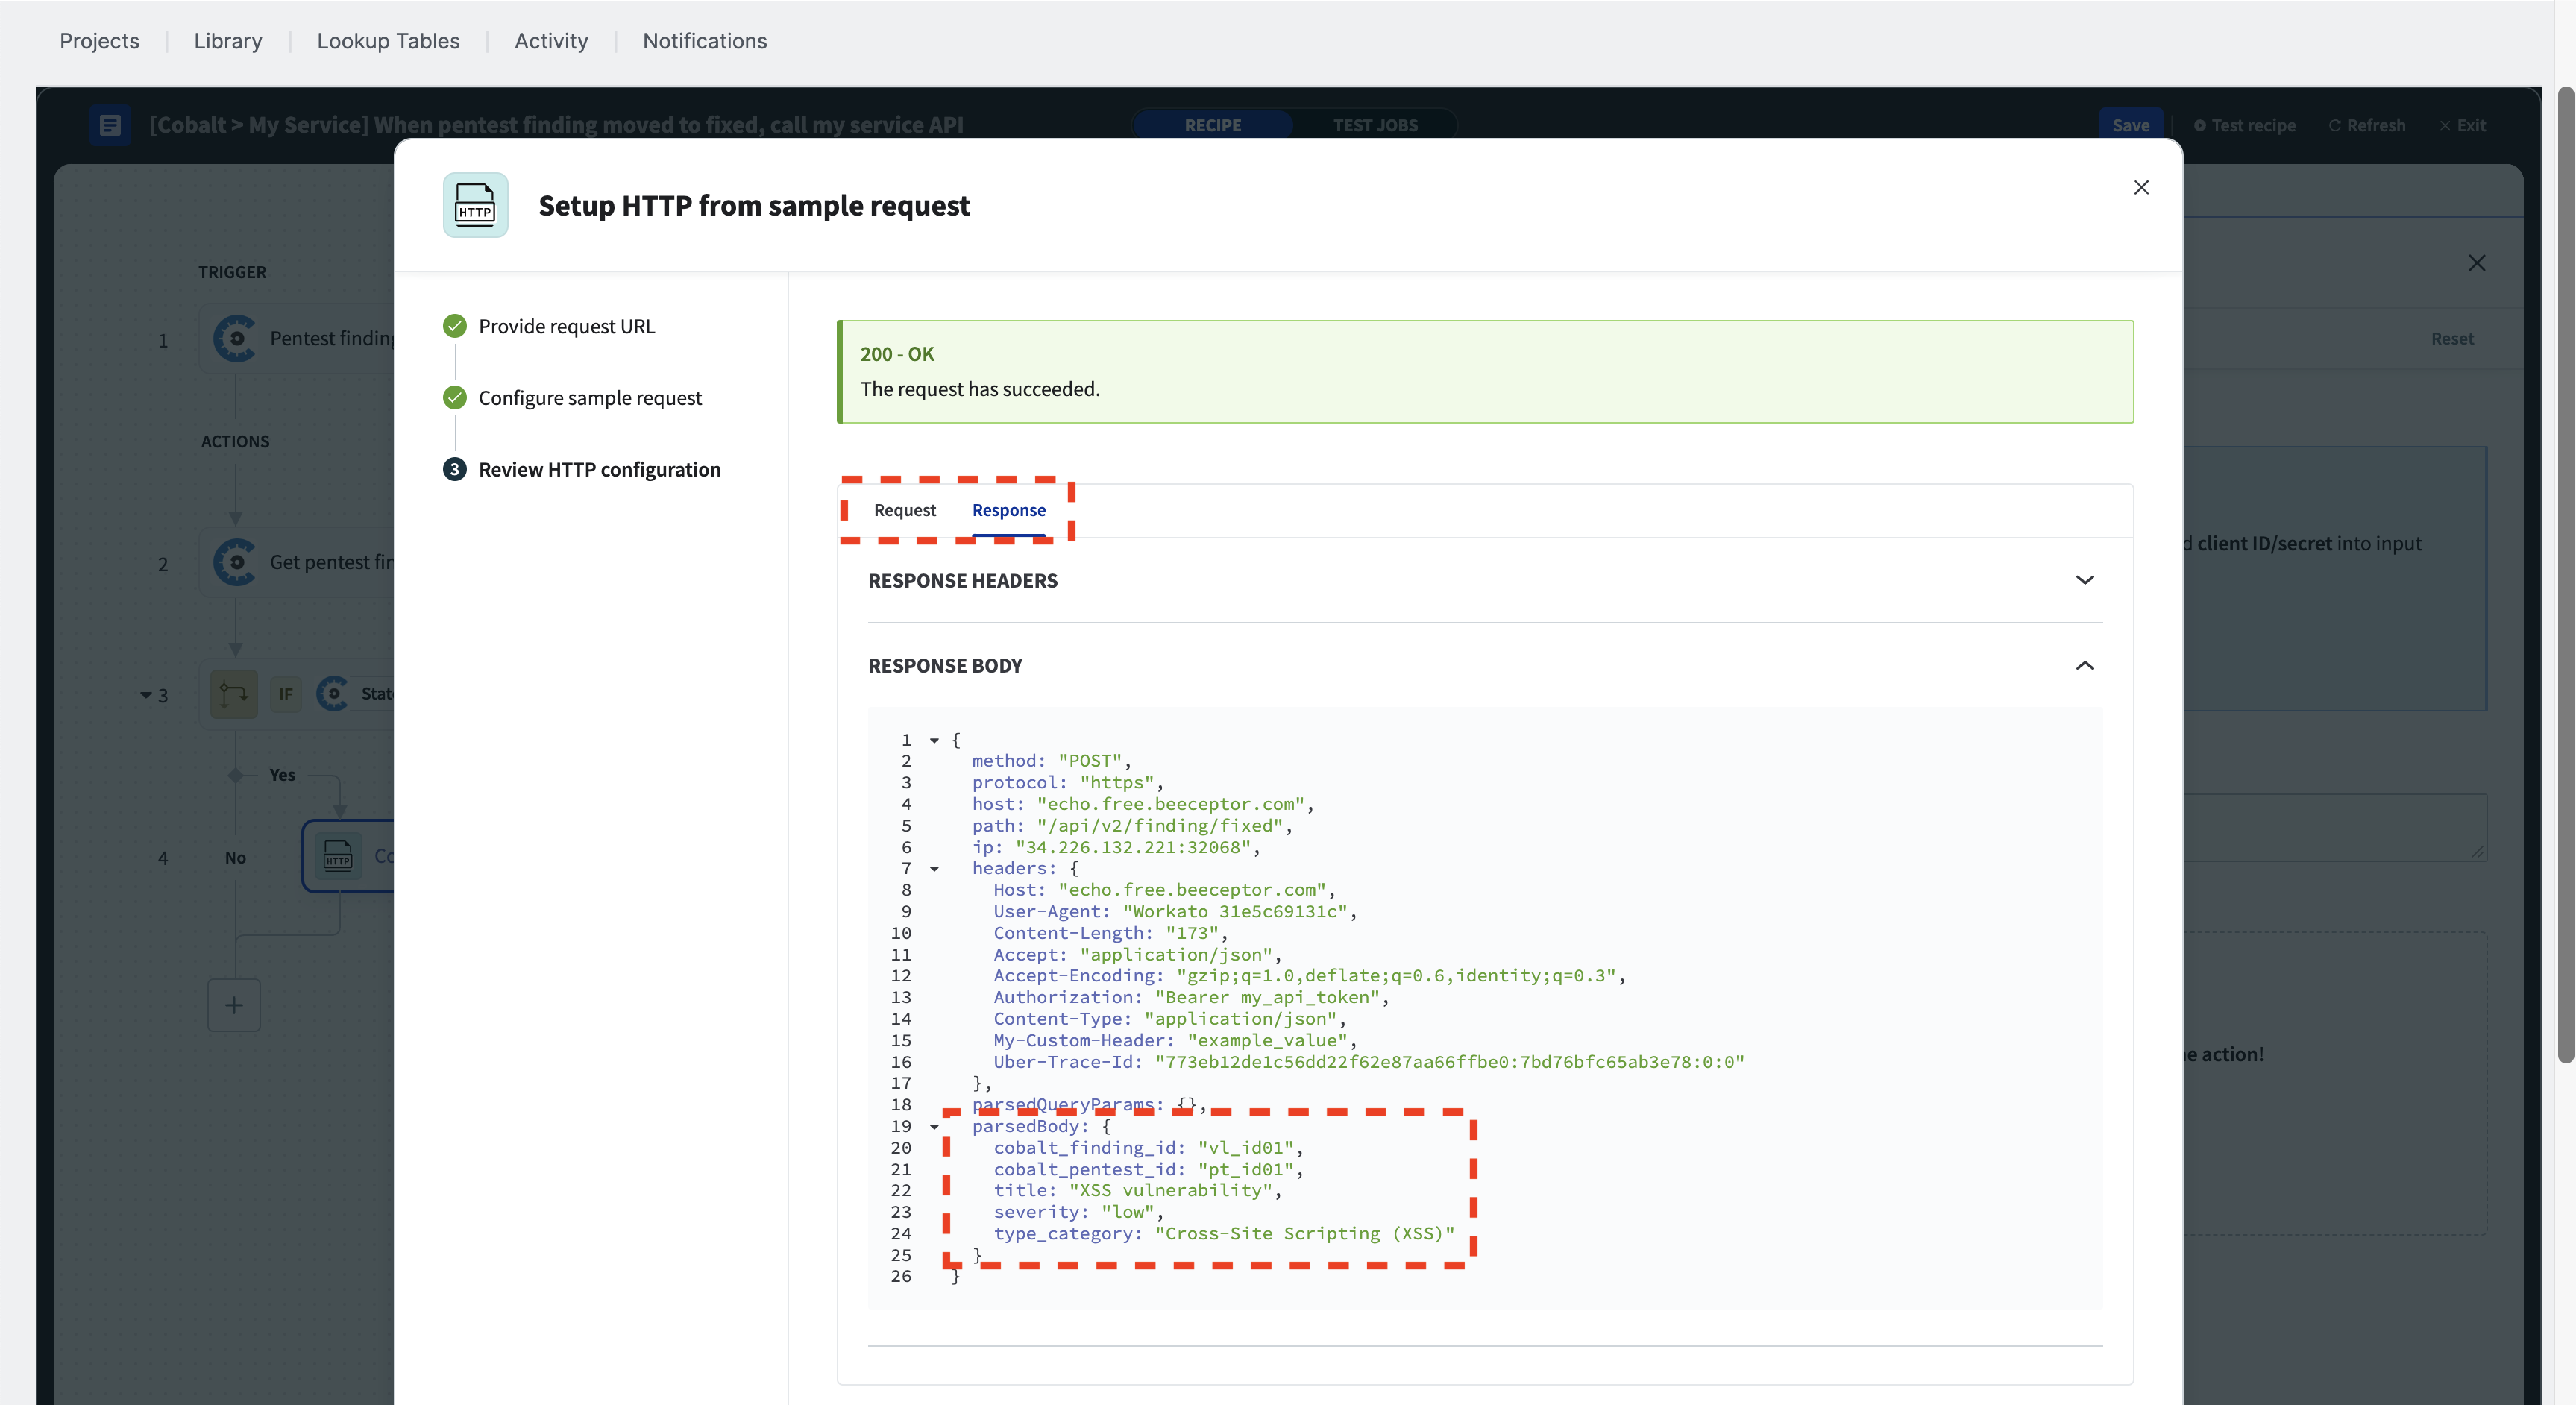
ⓘ Please note that this example service is a basic echo server, which will return all details about the request body and headers.
Map Cobalt data
When you click into the “Request body” field, a datapill popup will appear. This allows you to create a dynamic request body, mapping Cobalt data to your API format.
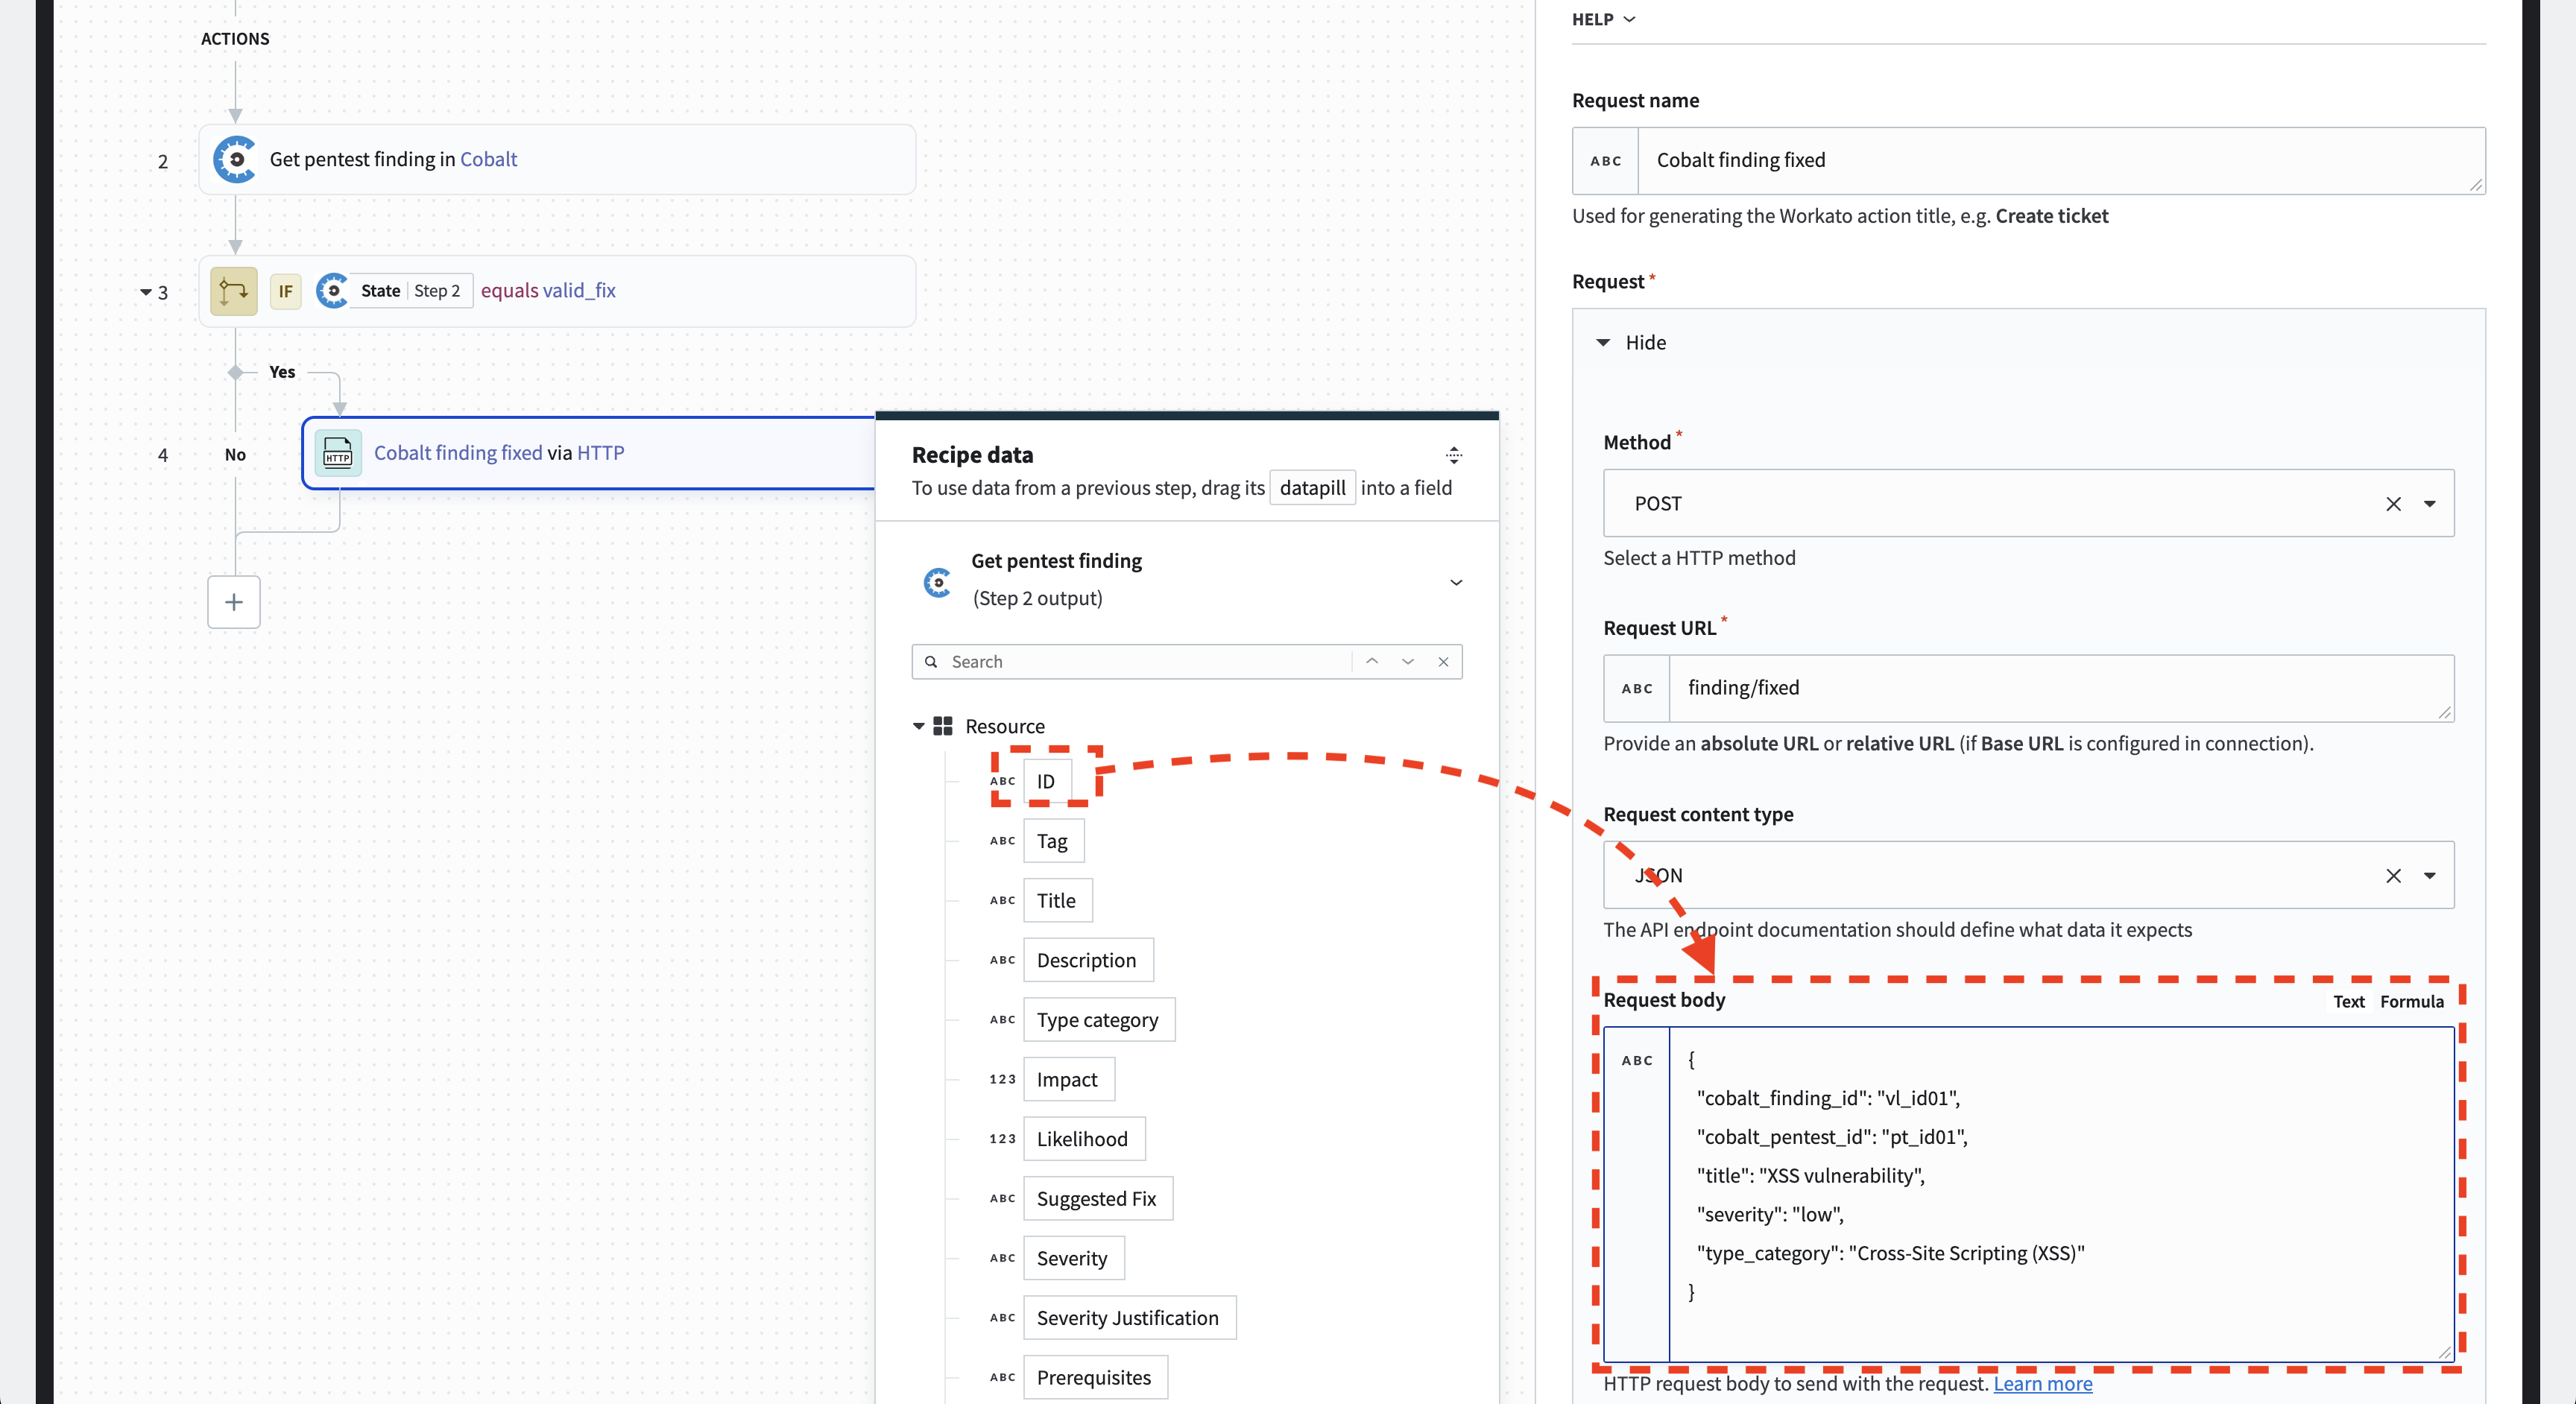
You can drag and drop Cobalt-specific datapills into the request body.
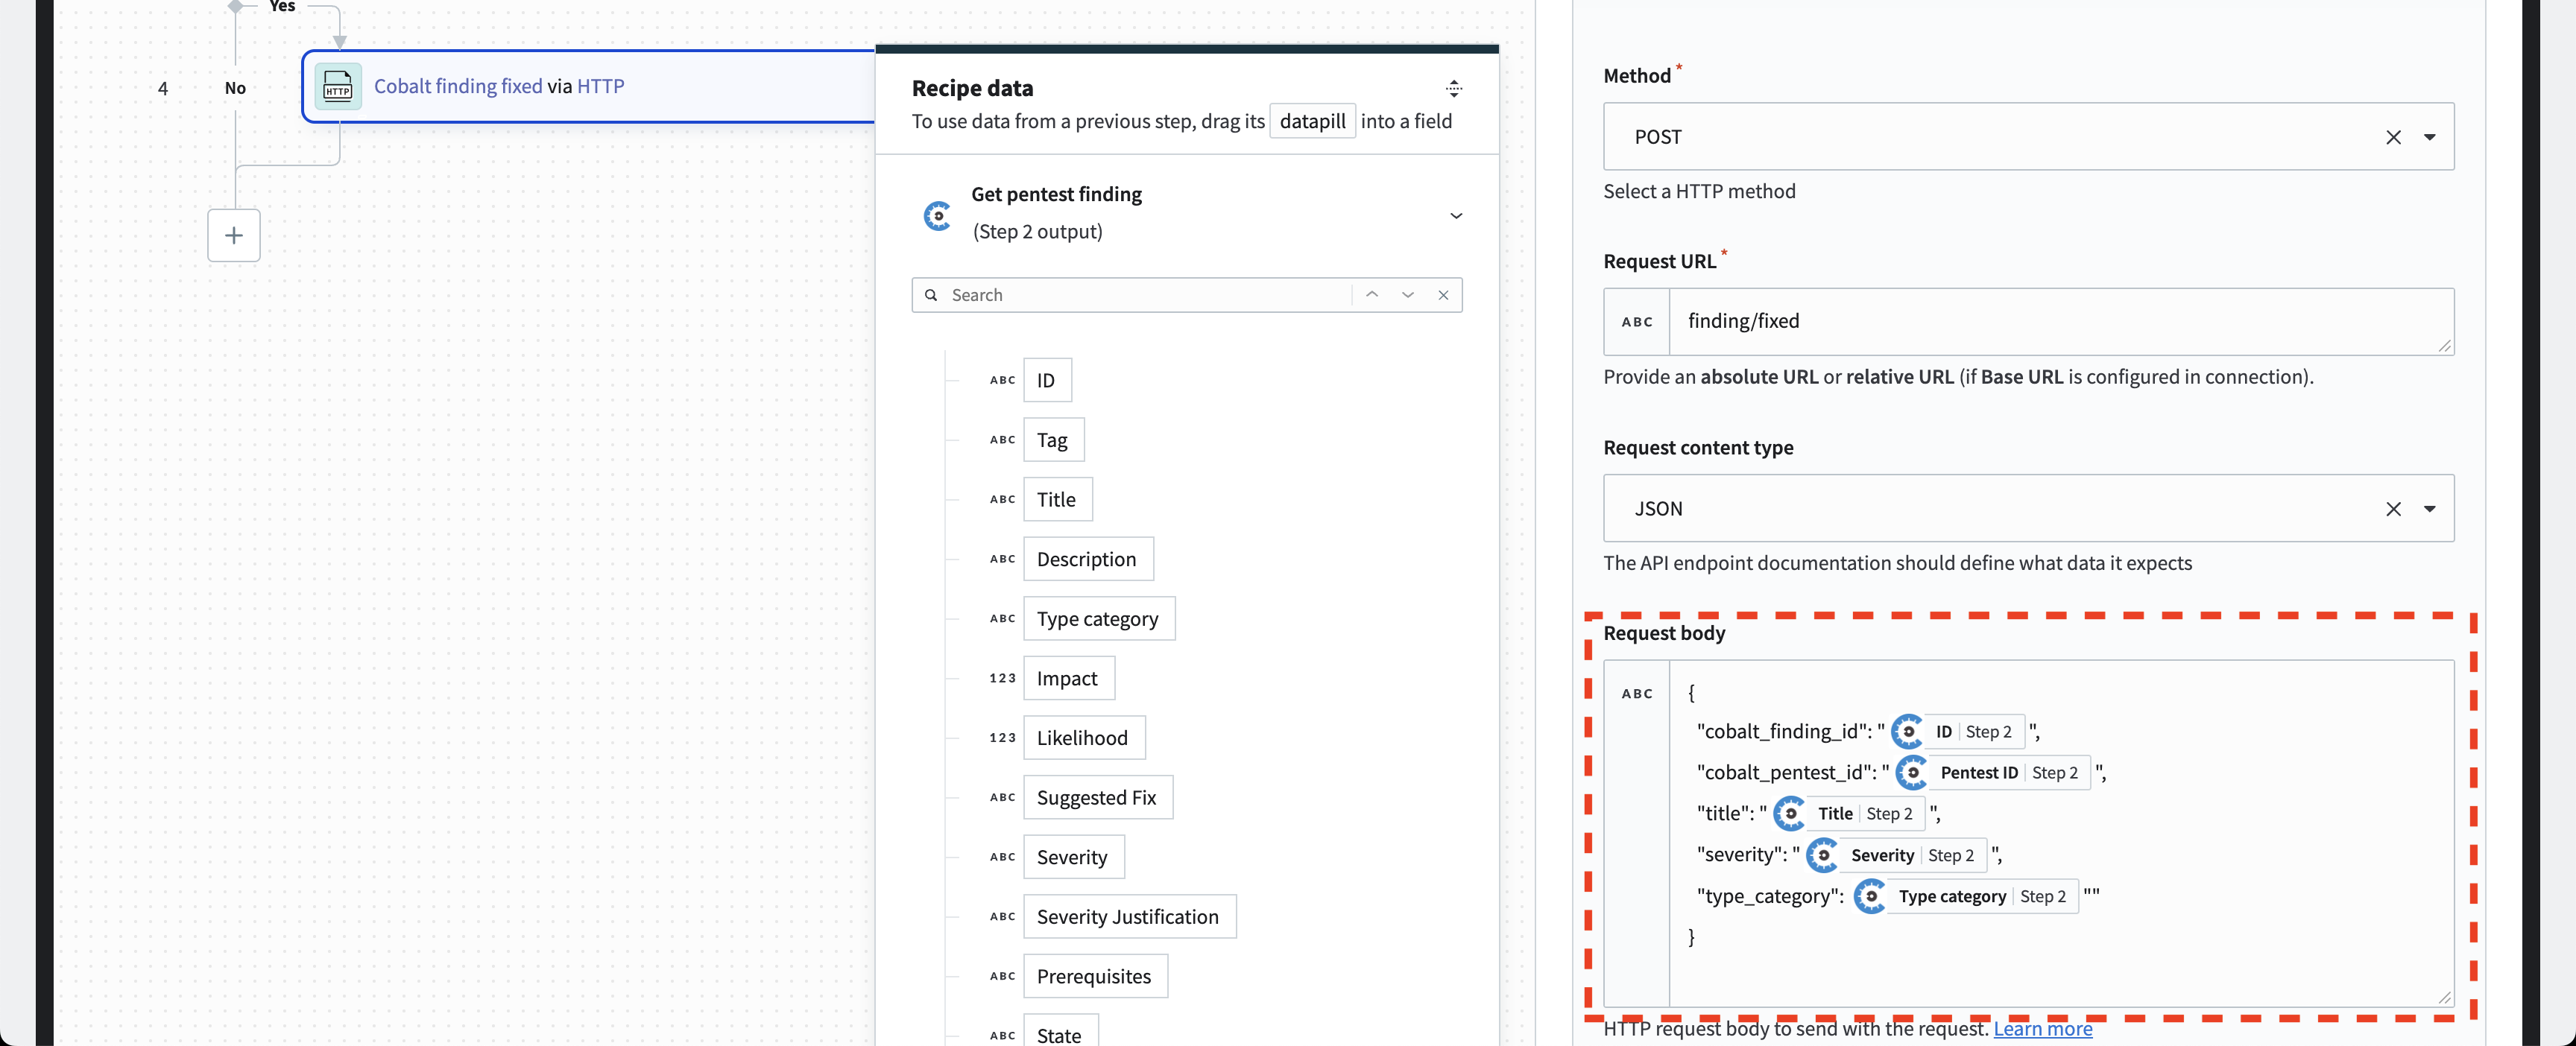
ⓘ If you have chosen not to use the guided setup or have canceled the wizard, you can manually use a mixture of text and data pills to build the request body.
Customize the request headers if you wish.

After finishing the HTTP action setup, “Save” the recipe and click on “Exit”.

Recipe in-action
To view the recipe in action, you need to start it first. This may take a few seconds to initiate.

Once the recipe is running, you can monitor events by checking the “Jobs” tab. This tab can remain open to verify if a the pentest finding status update triggers the desired action. The recipe will continue to run even if you close the tab. If you need to stop the recipe, simply click “Stop recipe.” To make any edits to the recipe, you must stop it first.

ⓘ To test the recipe with pentest findings using an In-House pentest, follow the guide for creating a test finding.
Read the HTTP requests and responses
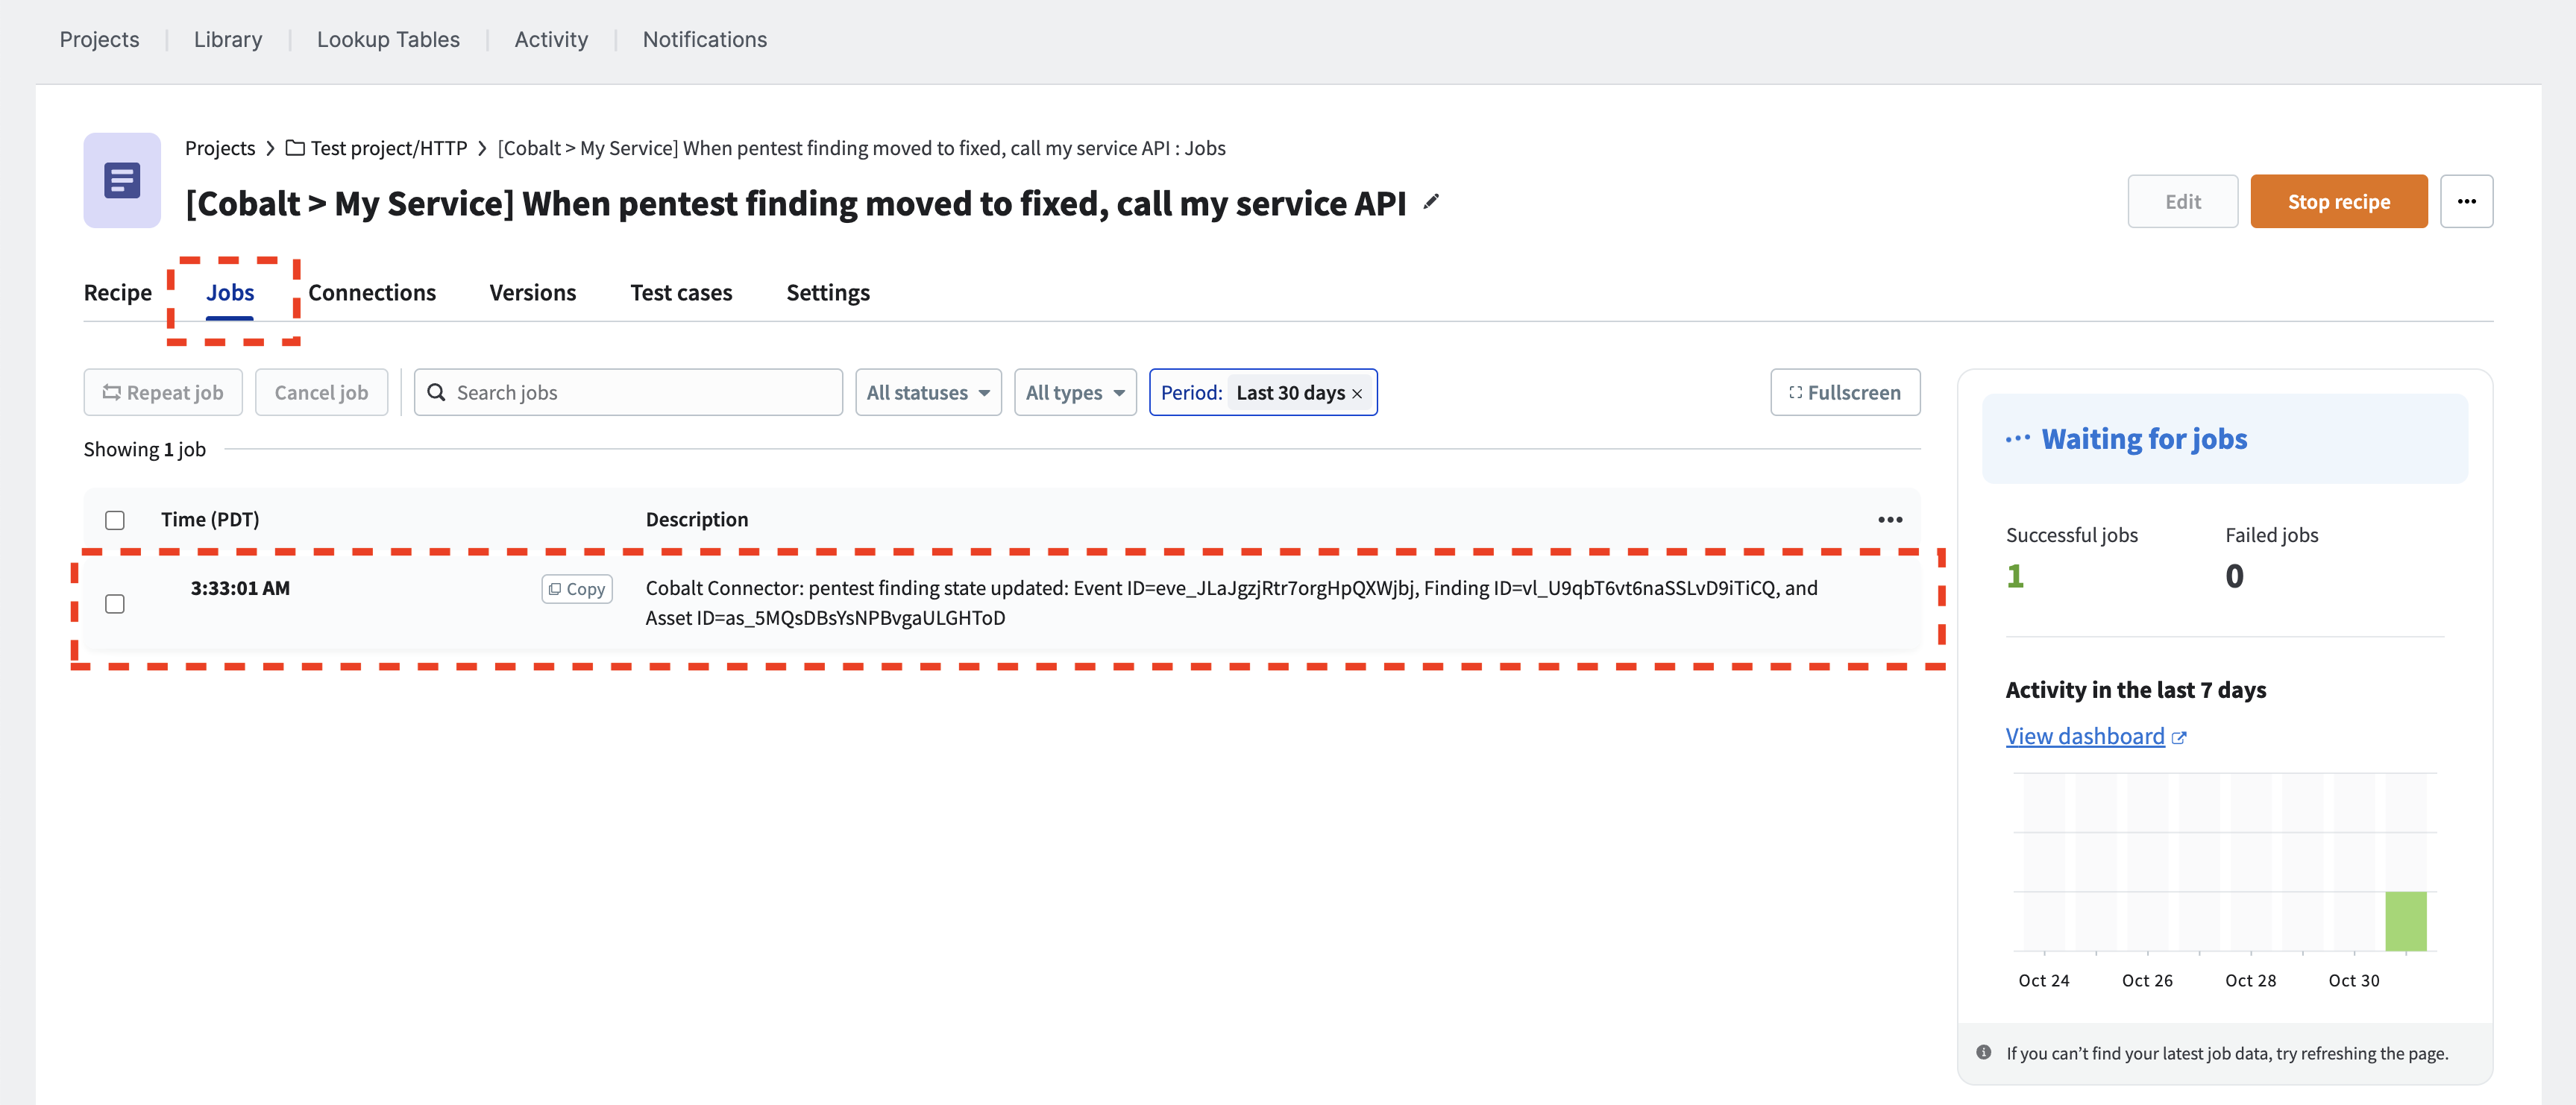
When a pentest finding is submitted by a tester, it will be in the status of “Pending Fix.”

Let’s verify that our recipe has run. Go to the recipe you created, and select the “Jobs” tab if it’s not already selected. Then, choose the most recent job.
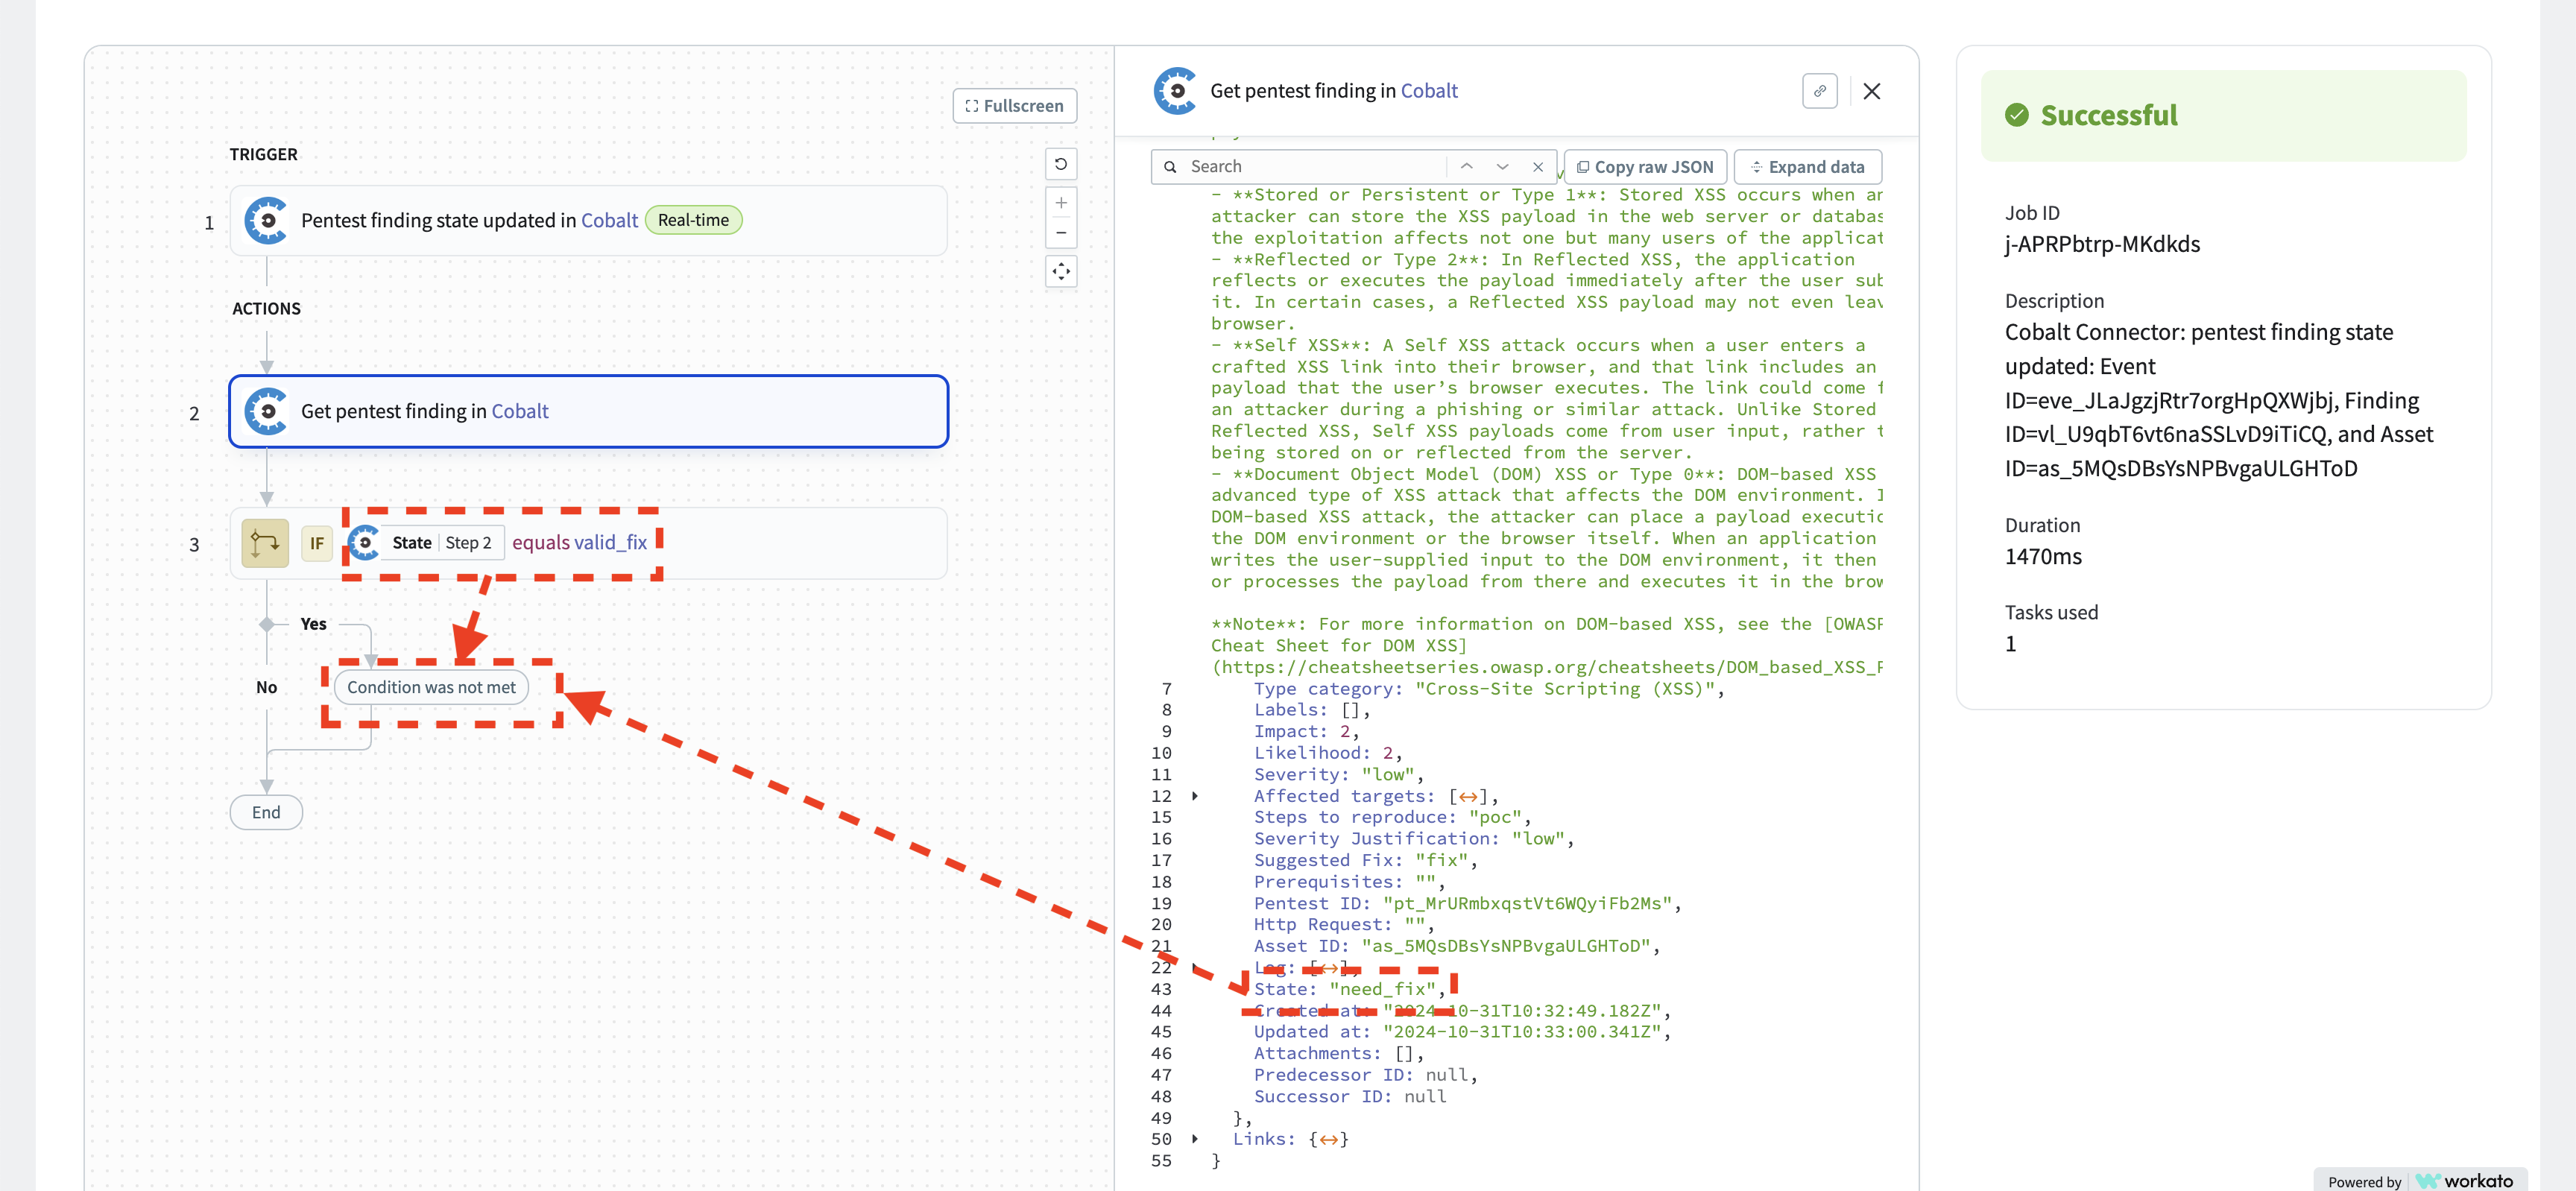
When you select the trigger, the actions, or the IF condition, you can see additional debug information for the selected step. For example, the recipe has run, it looked up the pentest finding, but the pentest finding status was need_fix (which corresponds to “Pending Fix” in the UI). Therefore, the condition evaluated to false, and the HTTP action did not run. All is looking correct; this is the expected behavior.
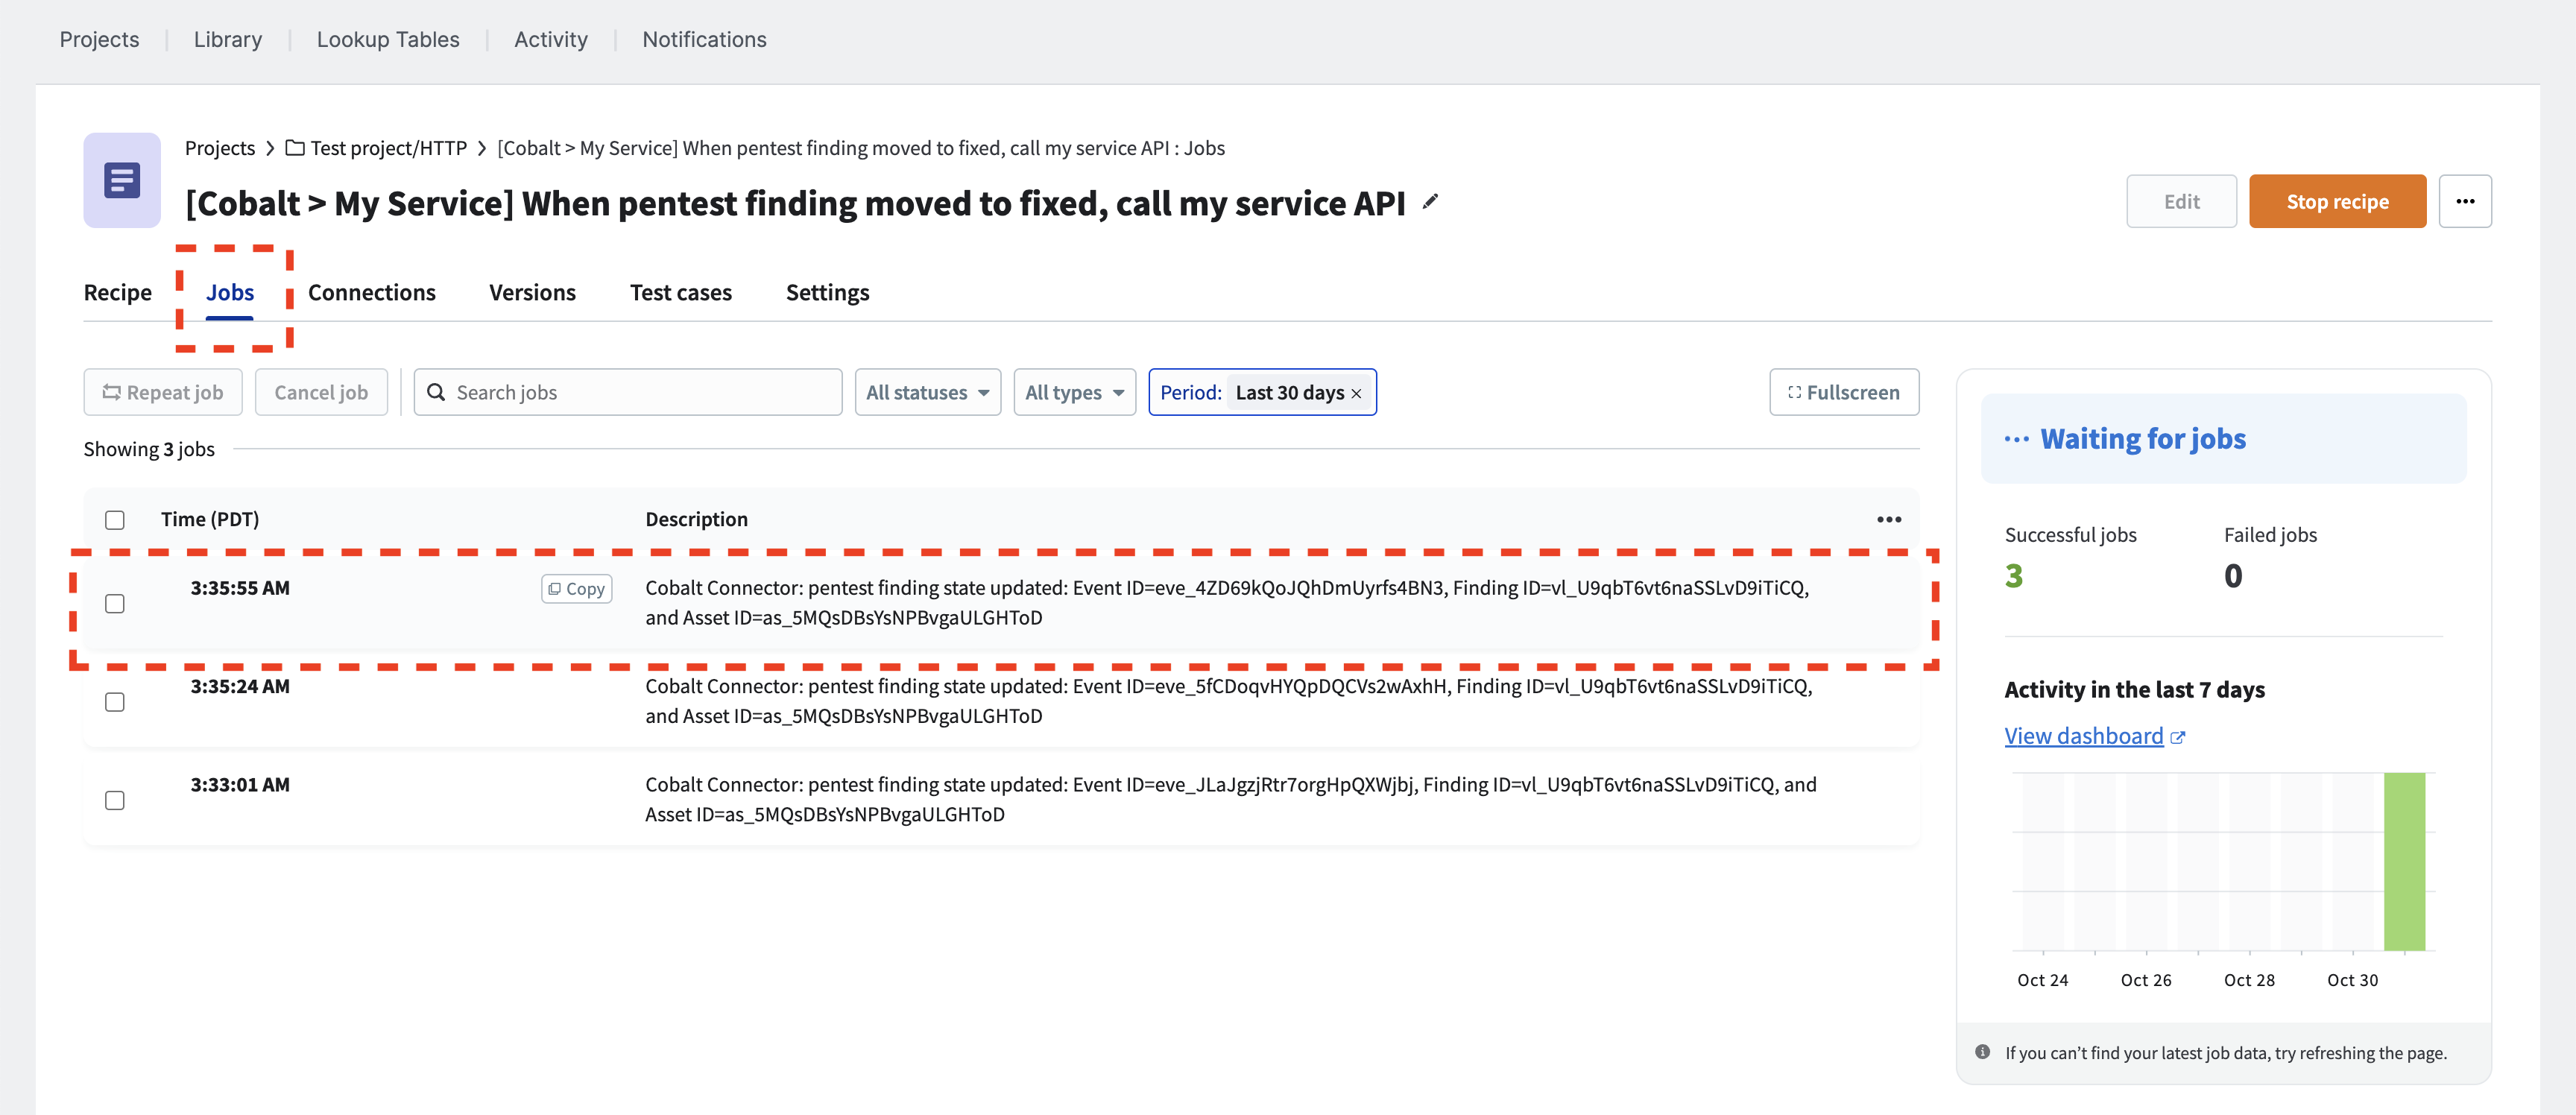
After the pentest finding status changes to “Fixed” in Cobalt, another job runs for the activated recipe.

Let’s investigate the most recent job result from the “Jobs” tab of the recipe.
ⓘ The status of a pentest finding changes more than twice when transitioning from “Pending Fix” to “Fixed”, indicating that more than two jobs have been executed.
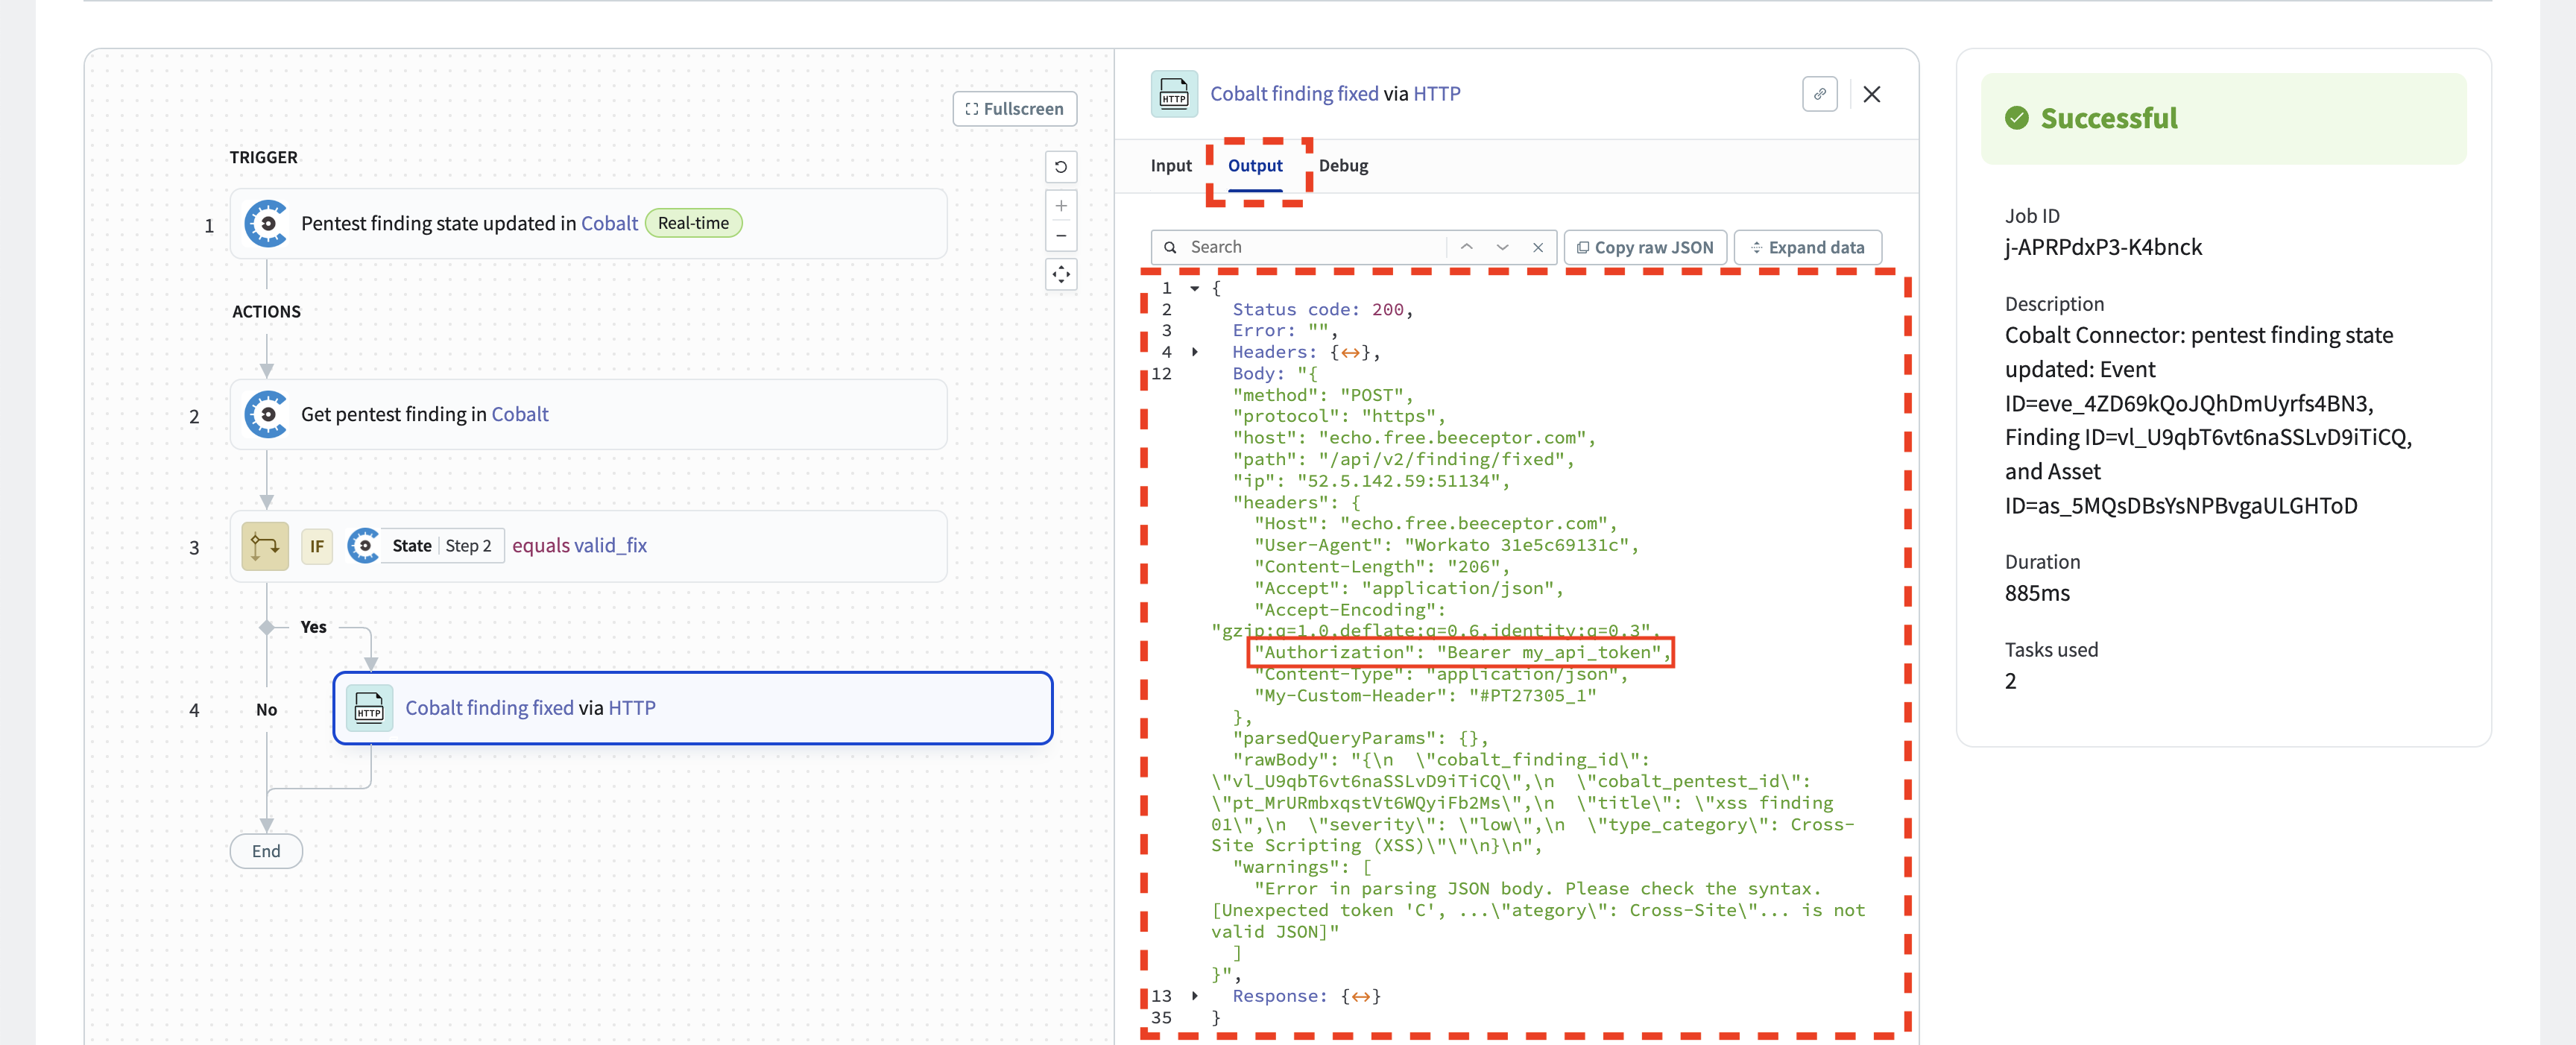
Select the “Cobalt finding fixed via HTTP” action and check the “Input” tab. Verify that the request body is as expected. Ensure that any custom headers you have configured are present in the output request. However, note that the authentication header is not visible in the action. This is correct. Setting the auth header is the responsibility of the connector and the credentials are not visible for the action.
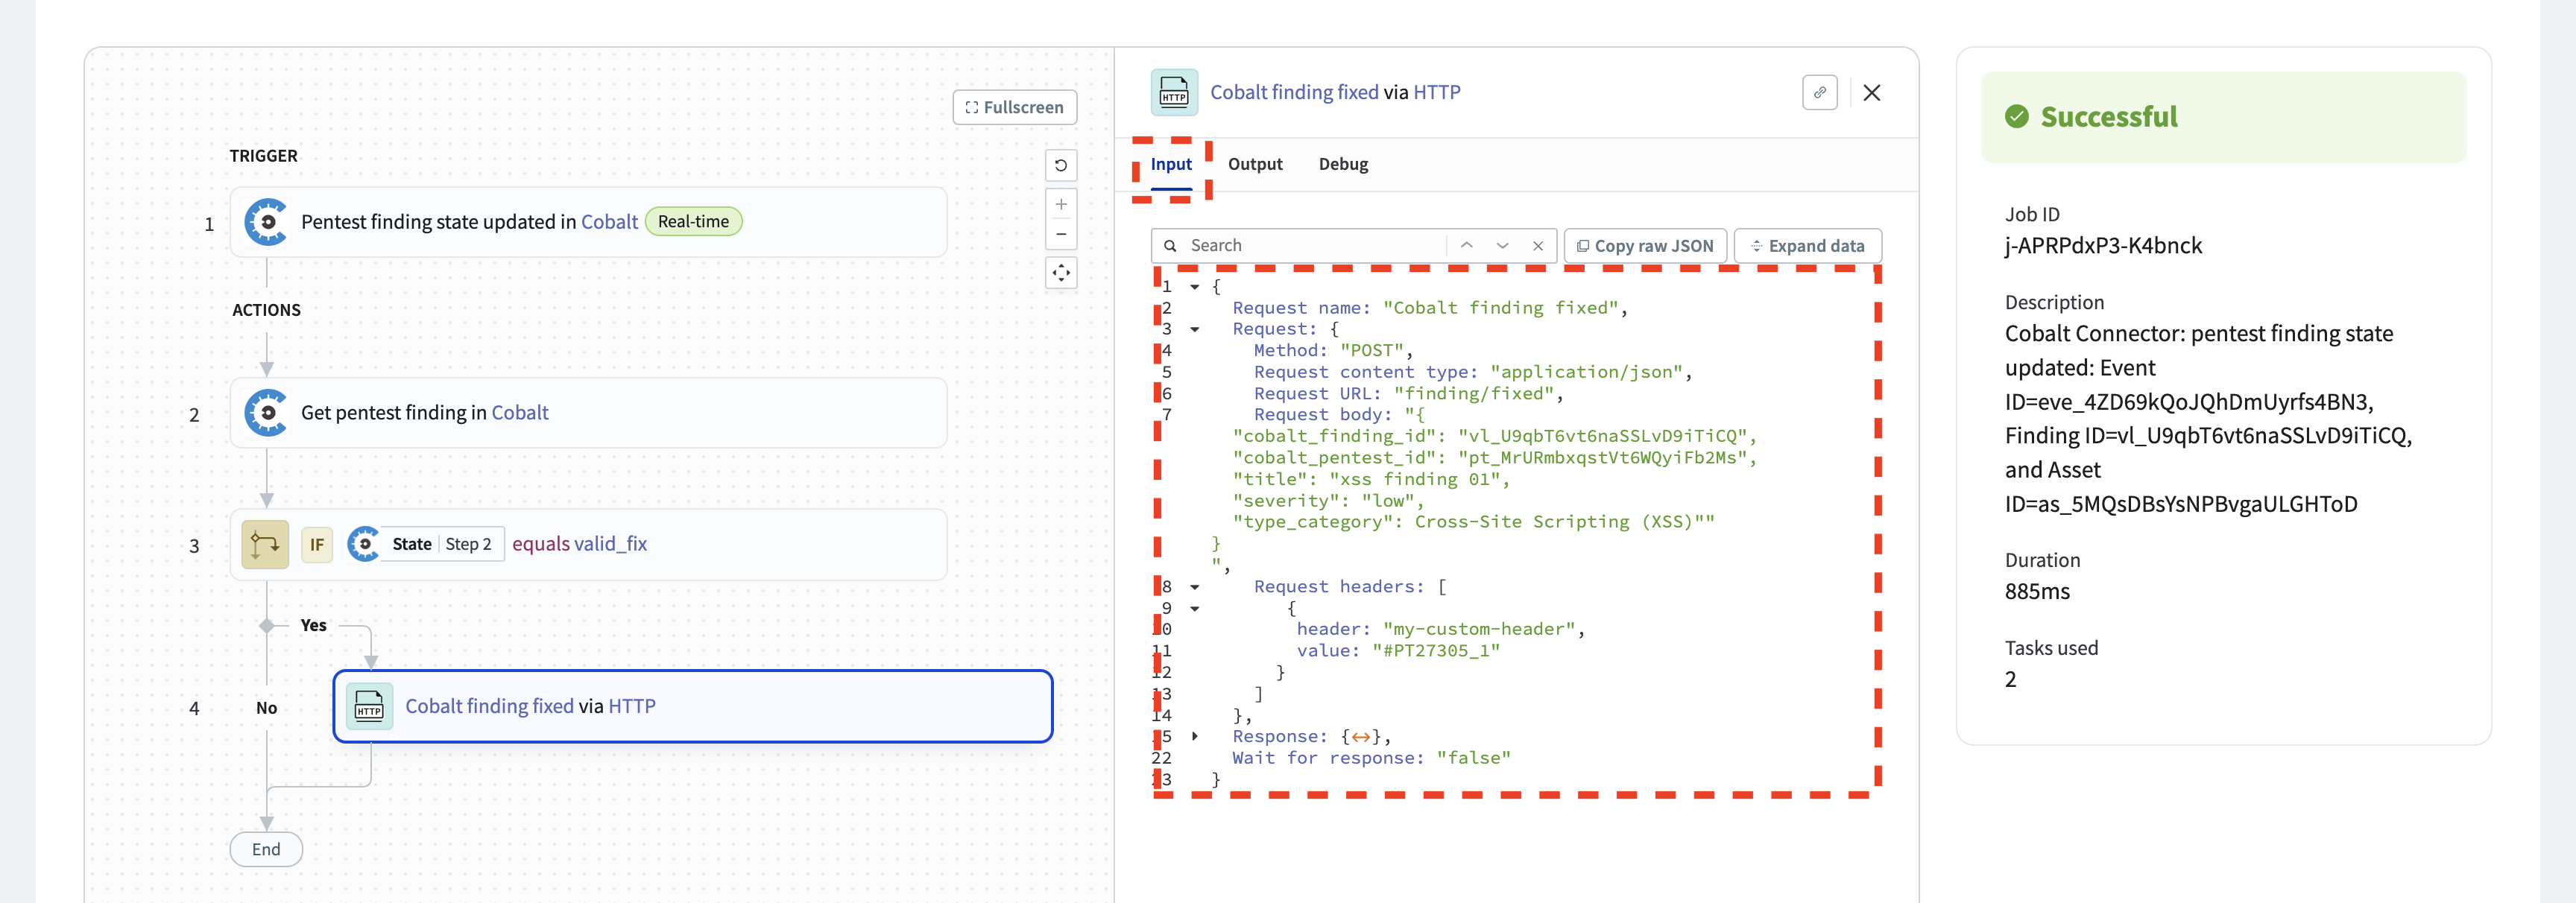
Click on the “Output” tab to view the HTTP response from the service in response to our POST request. Since this example utilizes an echo server, we should observe the authentication headers with the token set by the HTTP connector in the response body. These headers are indeed present.
